Euwww! It’s mushroom mania.

on the plateMushroom madness has hit my house. Well, maybe not the whole house since I am the only one who will eat them… At least, in a few cases the only one who knows they are eating them. Ha! I have been known to sneak them into dishes without telling Dear Hubby and Girly Girl. But before you starting thinking I am some kind of maniacal mushroom maniac, please settle down. It’s not like either one of them are allergic or anything like that.

As far as my husband goes, mushrooms are right up there with mayo in the “things I will not eat” category. I have quizzed him about both several times, asking if either were part of some kind of frat hazing or wrongly implicated in a case of food poisoning (but more likely a virus as most people know, its just way more dramatic to say, “I’ve got food poisoning!”).

Dear Hubby has never divulged the details, so I in my mind, both were most definitely part of some college shenanigans-type hangover incident. I attended college in the 1980’s – when the legal age to drink was 18 in my state – so folks, that makes me qualified to know about such things. And as far as Girly Girl goes, she is 5 years old. Of course she doesn’t like mushrooms – “Euwww!”

But none of this kept me from purchasing my very own mushroom farm after it popped up on an email from the shopping site, Open Sky. Actually I saw a list of recommended products from one of my favorite chefs, Hugh Acheson, and this was on that list. I had a credit also so I took a chance and here I am harvesting fresh oyster mushrooms a mere 3 weeks later. Thanks Hugh!

This is a fun winter-time project in my locale as it is cool and dry enough to grow these in the perfect indoor conditions now. In a couple of months it will be humid and hot – perfect to grow mold but not great mushrooms.

It took about a week or so for the first tiny ‘shrooms to appear. Once they popped up, it was go time. They grew very, very quickly – my husband is convinced he could see them growing before his eyes, so that was a tad freaky. My harvest was 4 days after they broke ground, although I could have taken them after the third day. But I had to time the harvest to coincide with making my favorite mushroom recipe – mushroom goat cheese toasts from the Mustards Grill Cookbook.

Chef Cindy Pawlcyn created a wondrous restaurant called Mustards Grill in Napa, CA and having been lucky enough to dine there (a long time ago) I can attest to that. I am glad to know she and the restaurant are still going strong after almost 30 years. This recipe relies on fresh ingredients and simple techniques, perfect to showcase those awesome mushrooms.

The box arrives! These were "born" in California.

The box arrives! These were “born” in California.

It is an easy set up. Remove the plastic wrapped block, slice it a couple of times with a sharp knife and sit the block in a cool spot that gets good indirect light. Loosely cover with the included plastic bag (that has slits cut in it). Every day spray the inside of the bag with a bit of water.

It is an easy set up. Remove the plastic wrapped block, slice it a couple of times with a sharp knife and sit the block in a cool spot that gets good indirect light. Loosely cover with the included plastic bag (that has slits cut in it). Every day spray the inside of the bag with a bit of water.

We have lift off! In less than 24 hours these grew from tiny nodules to this size.

We have lift off! In less than 24 hours these grew from tiny nodules to this size.

Here they are after 4 day's growth. Time to harvest!

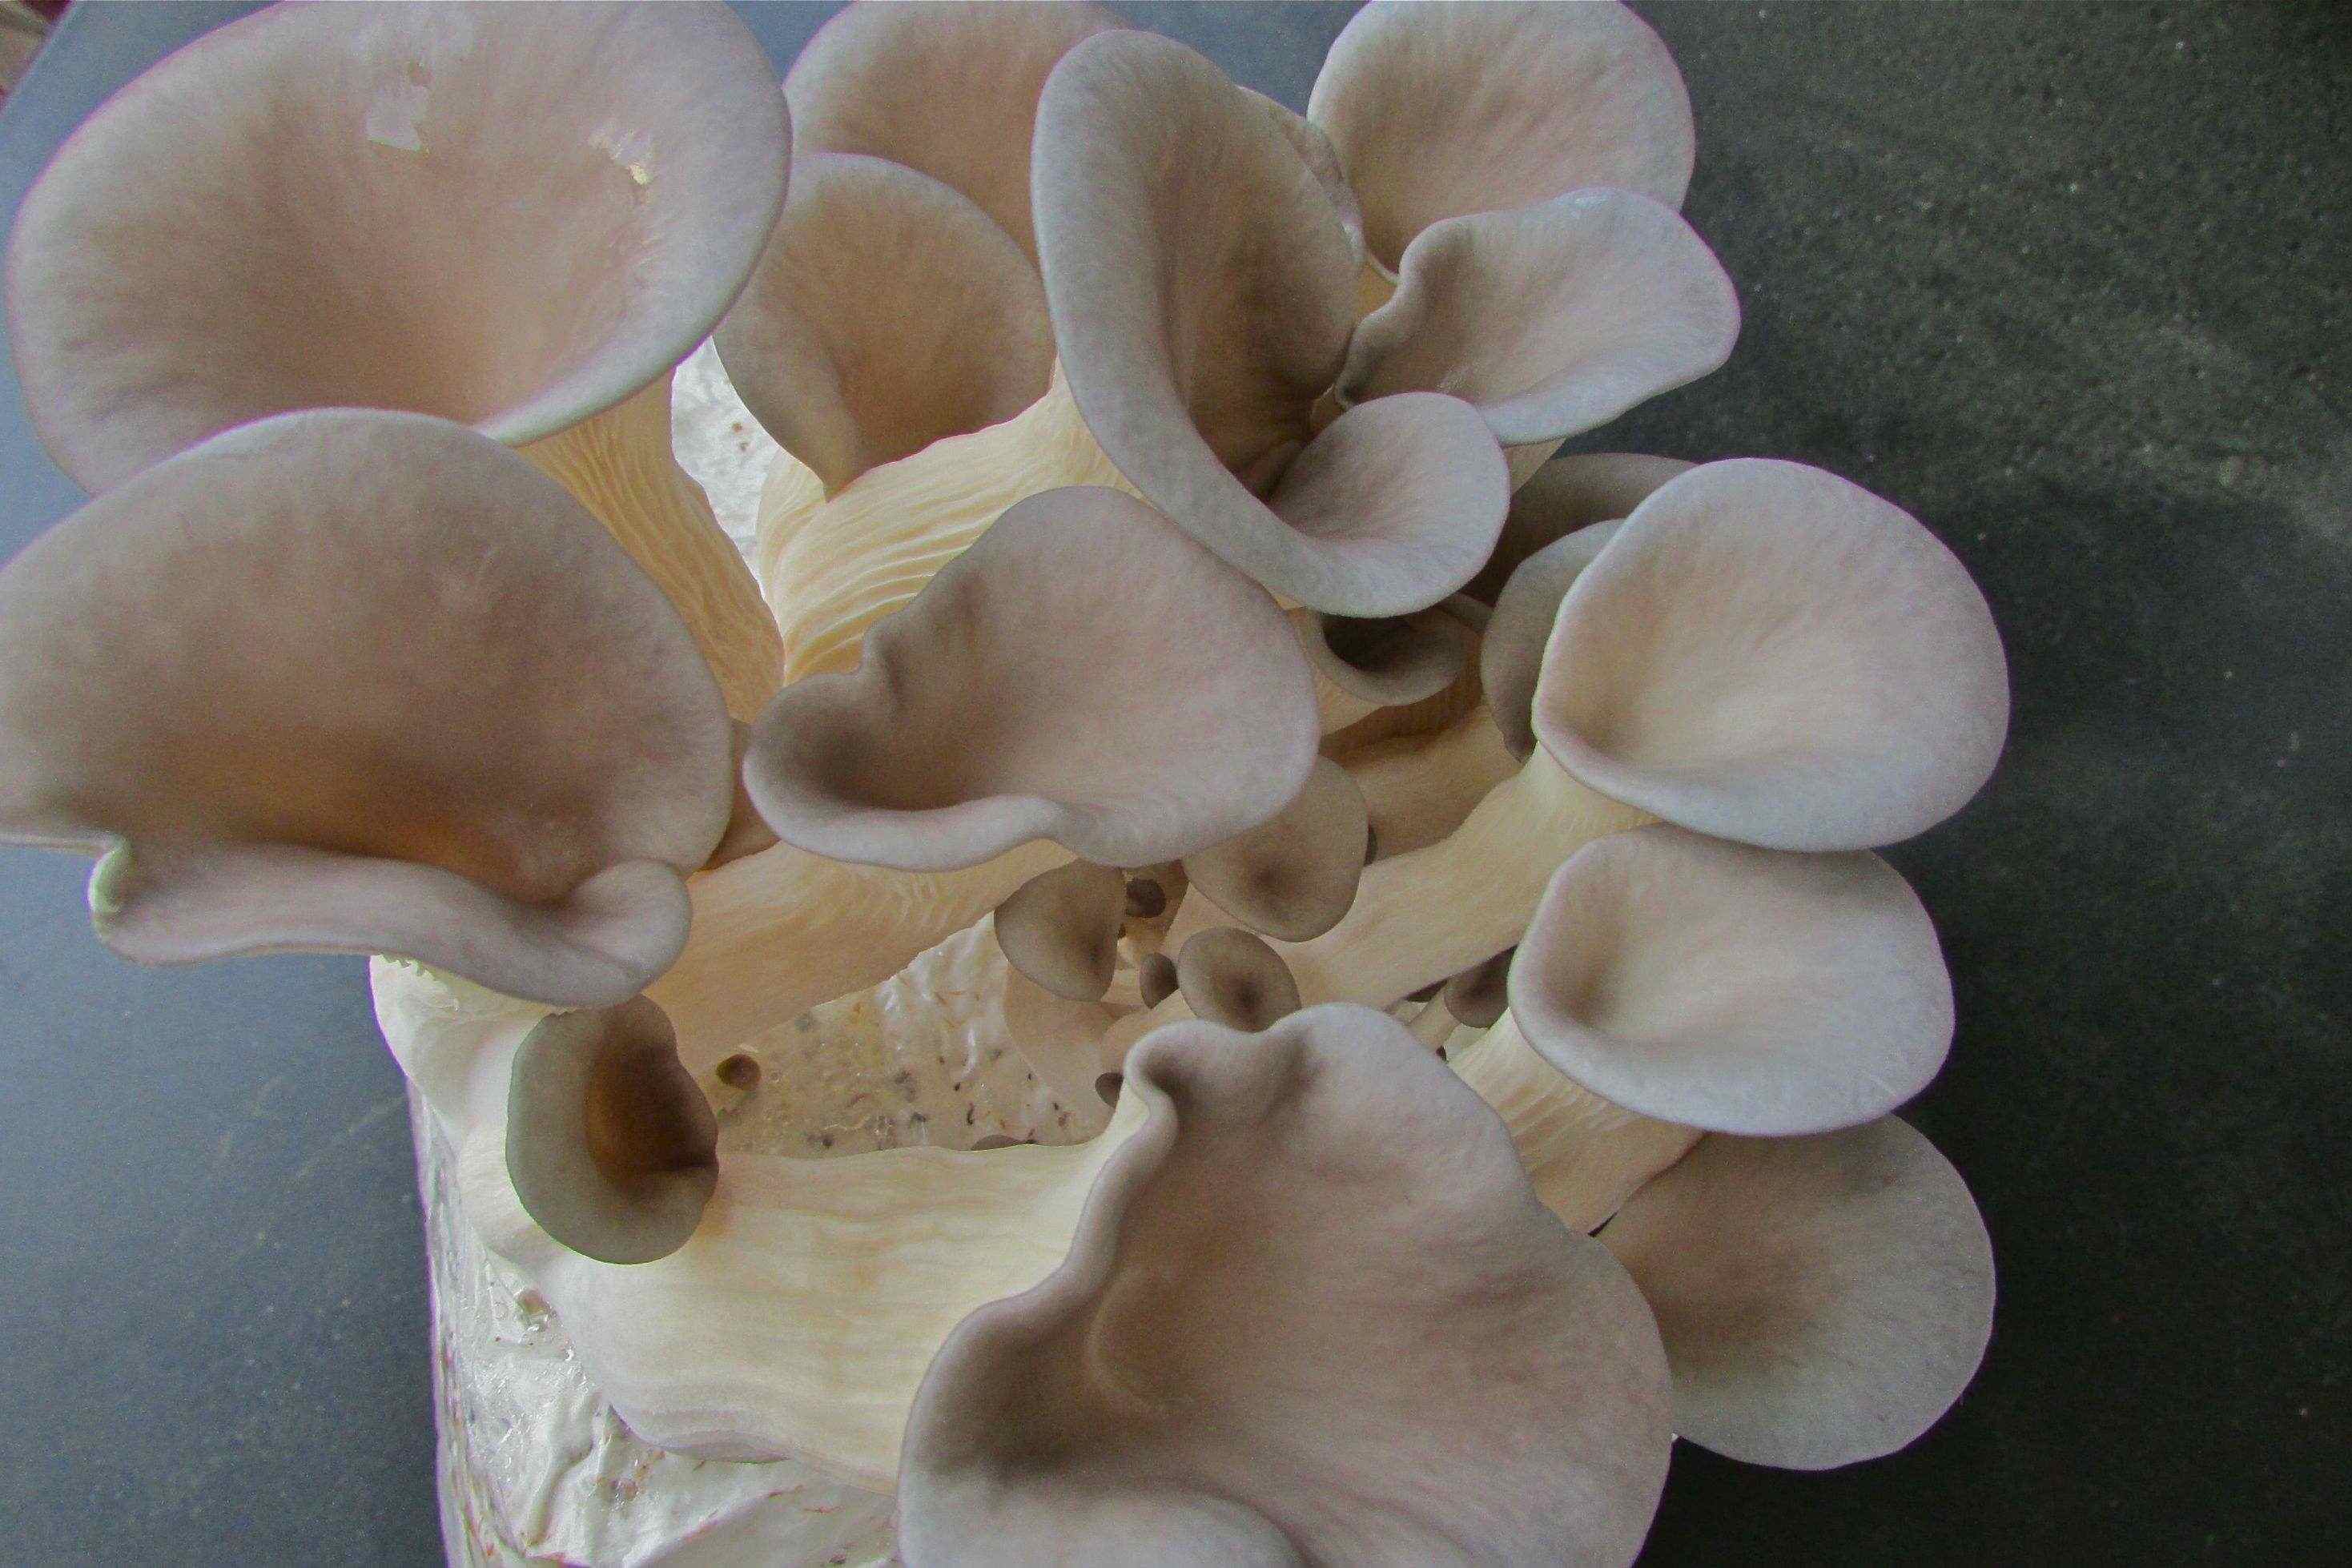
Here they are after 4 day’s growth. Time to harvest!

These are definitely ready to cut and make into something delicious.

These are definitely ready to cut and make into something delicious.

The prepared mushrooms - both the oyster mushrooms I grew and some purchased portobellos - Chef Pawlcyn uses morels but a combination of different mushrooms will work great.

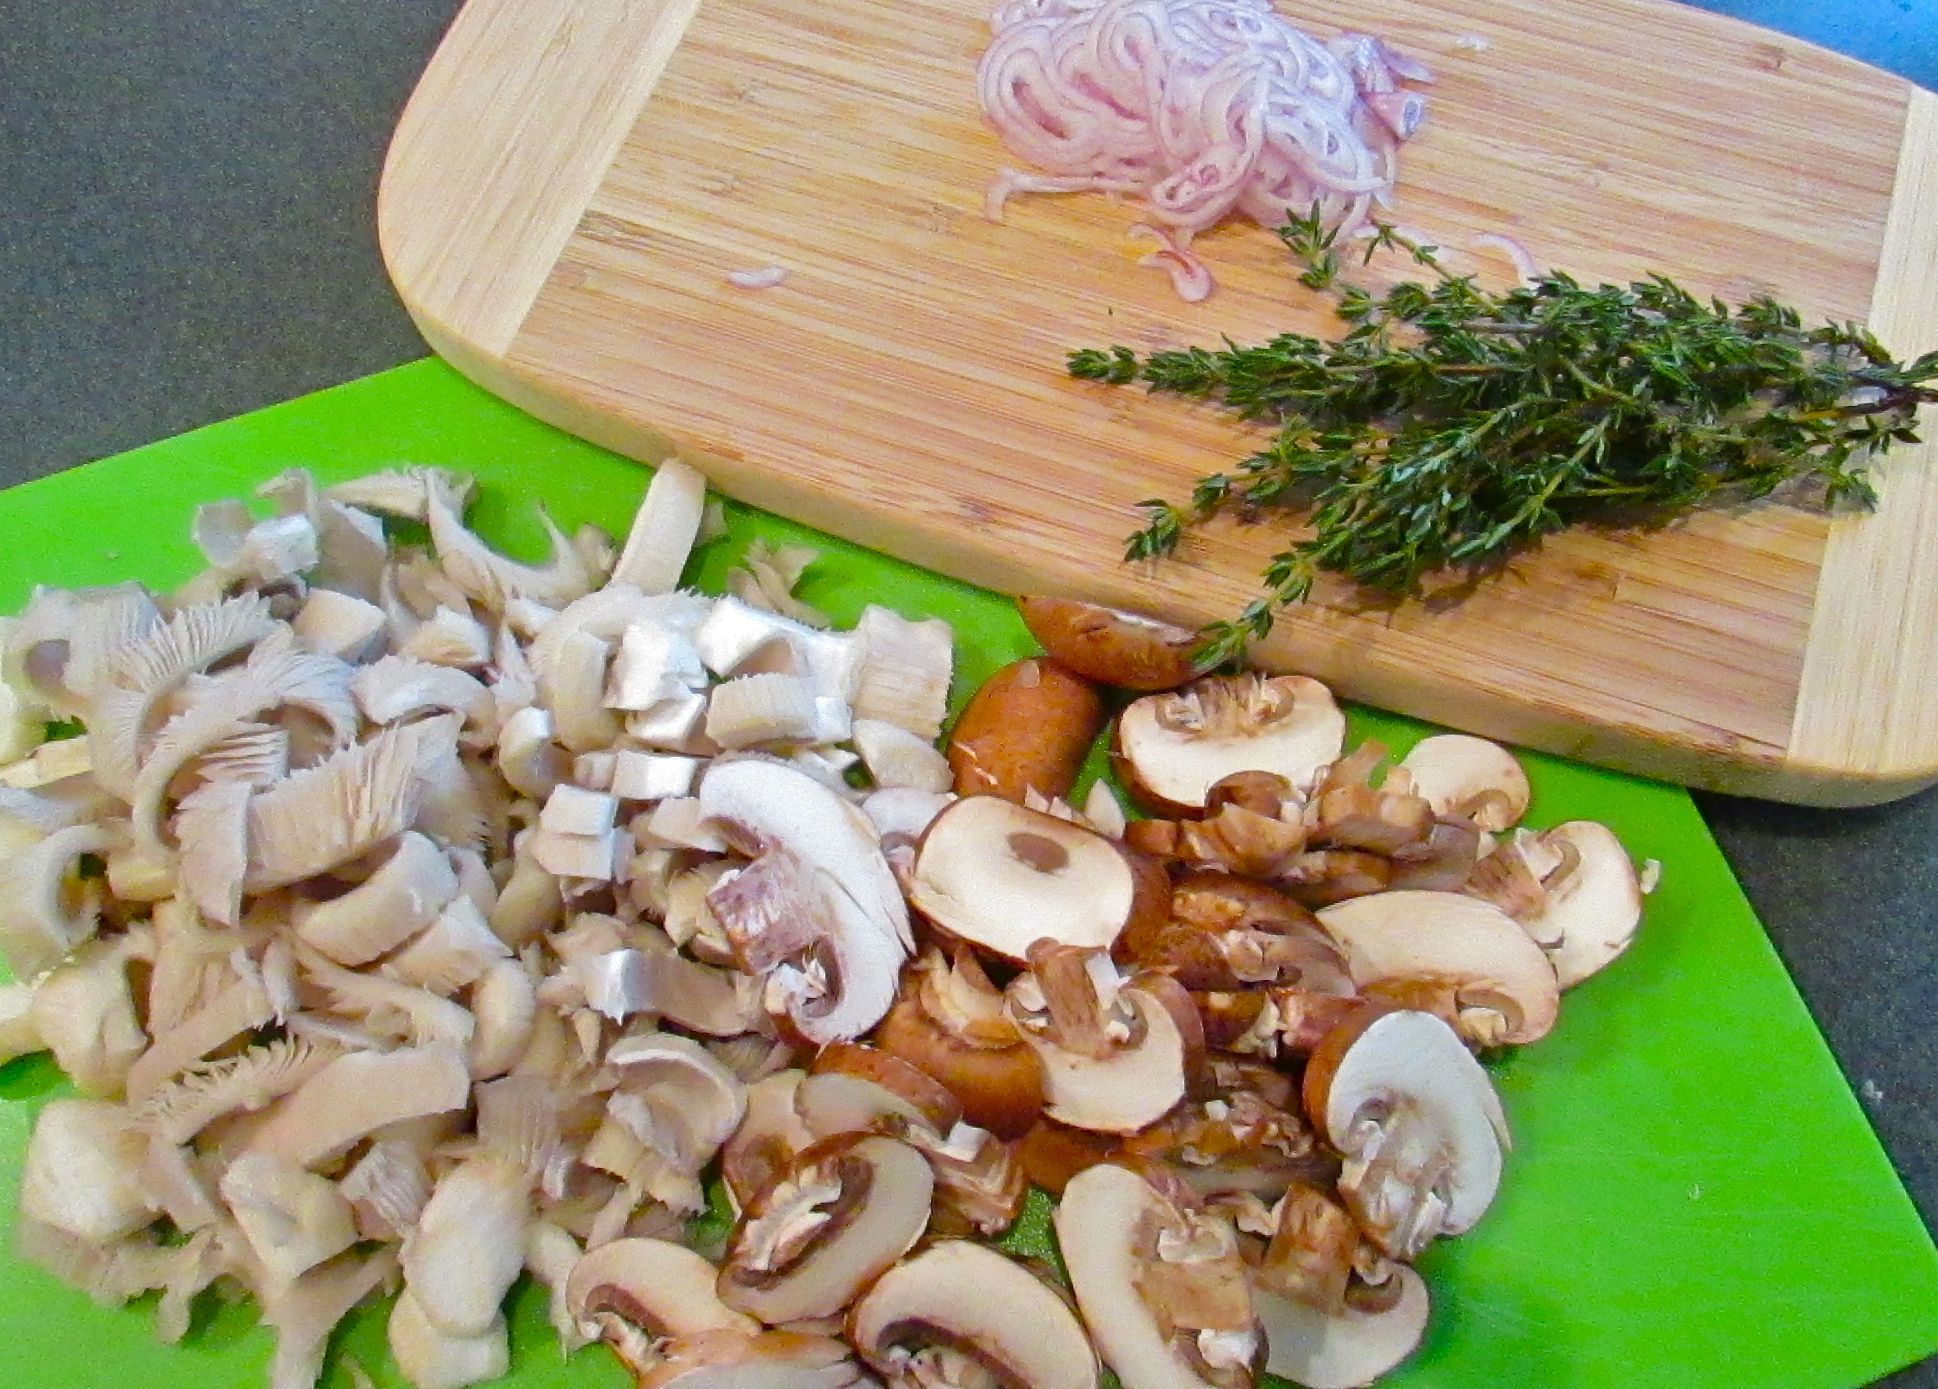
The prepared mushrooms – both the oyster mushrooms I grew and some purchased portobellos -Chef Pawlcyn uses morels but a combination of different mushrooms will work great.

Saute the shallots in the oil and butter.

Saute the shallots in the oil and butter.

Add the Applejack (or Calvados or other suggested liquor) to the mushroom/shallot mixture. Toss in the thyme and season with salt and pepper.

Add the Applejack (or Calvados or other suggested liquor) to the mushroom/shallot mixture. Toss in the thyme and season with salt and pepper.

Mix the goat cheese and cream until smooth.

Mix the goat cheese and cream until smooth.

Put the toasts together - slather a good layer of the goat cheese on toasted French bread slices, top with the warm mushroom mixture and sprinkle with parsley.

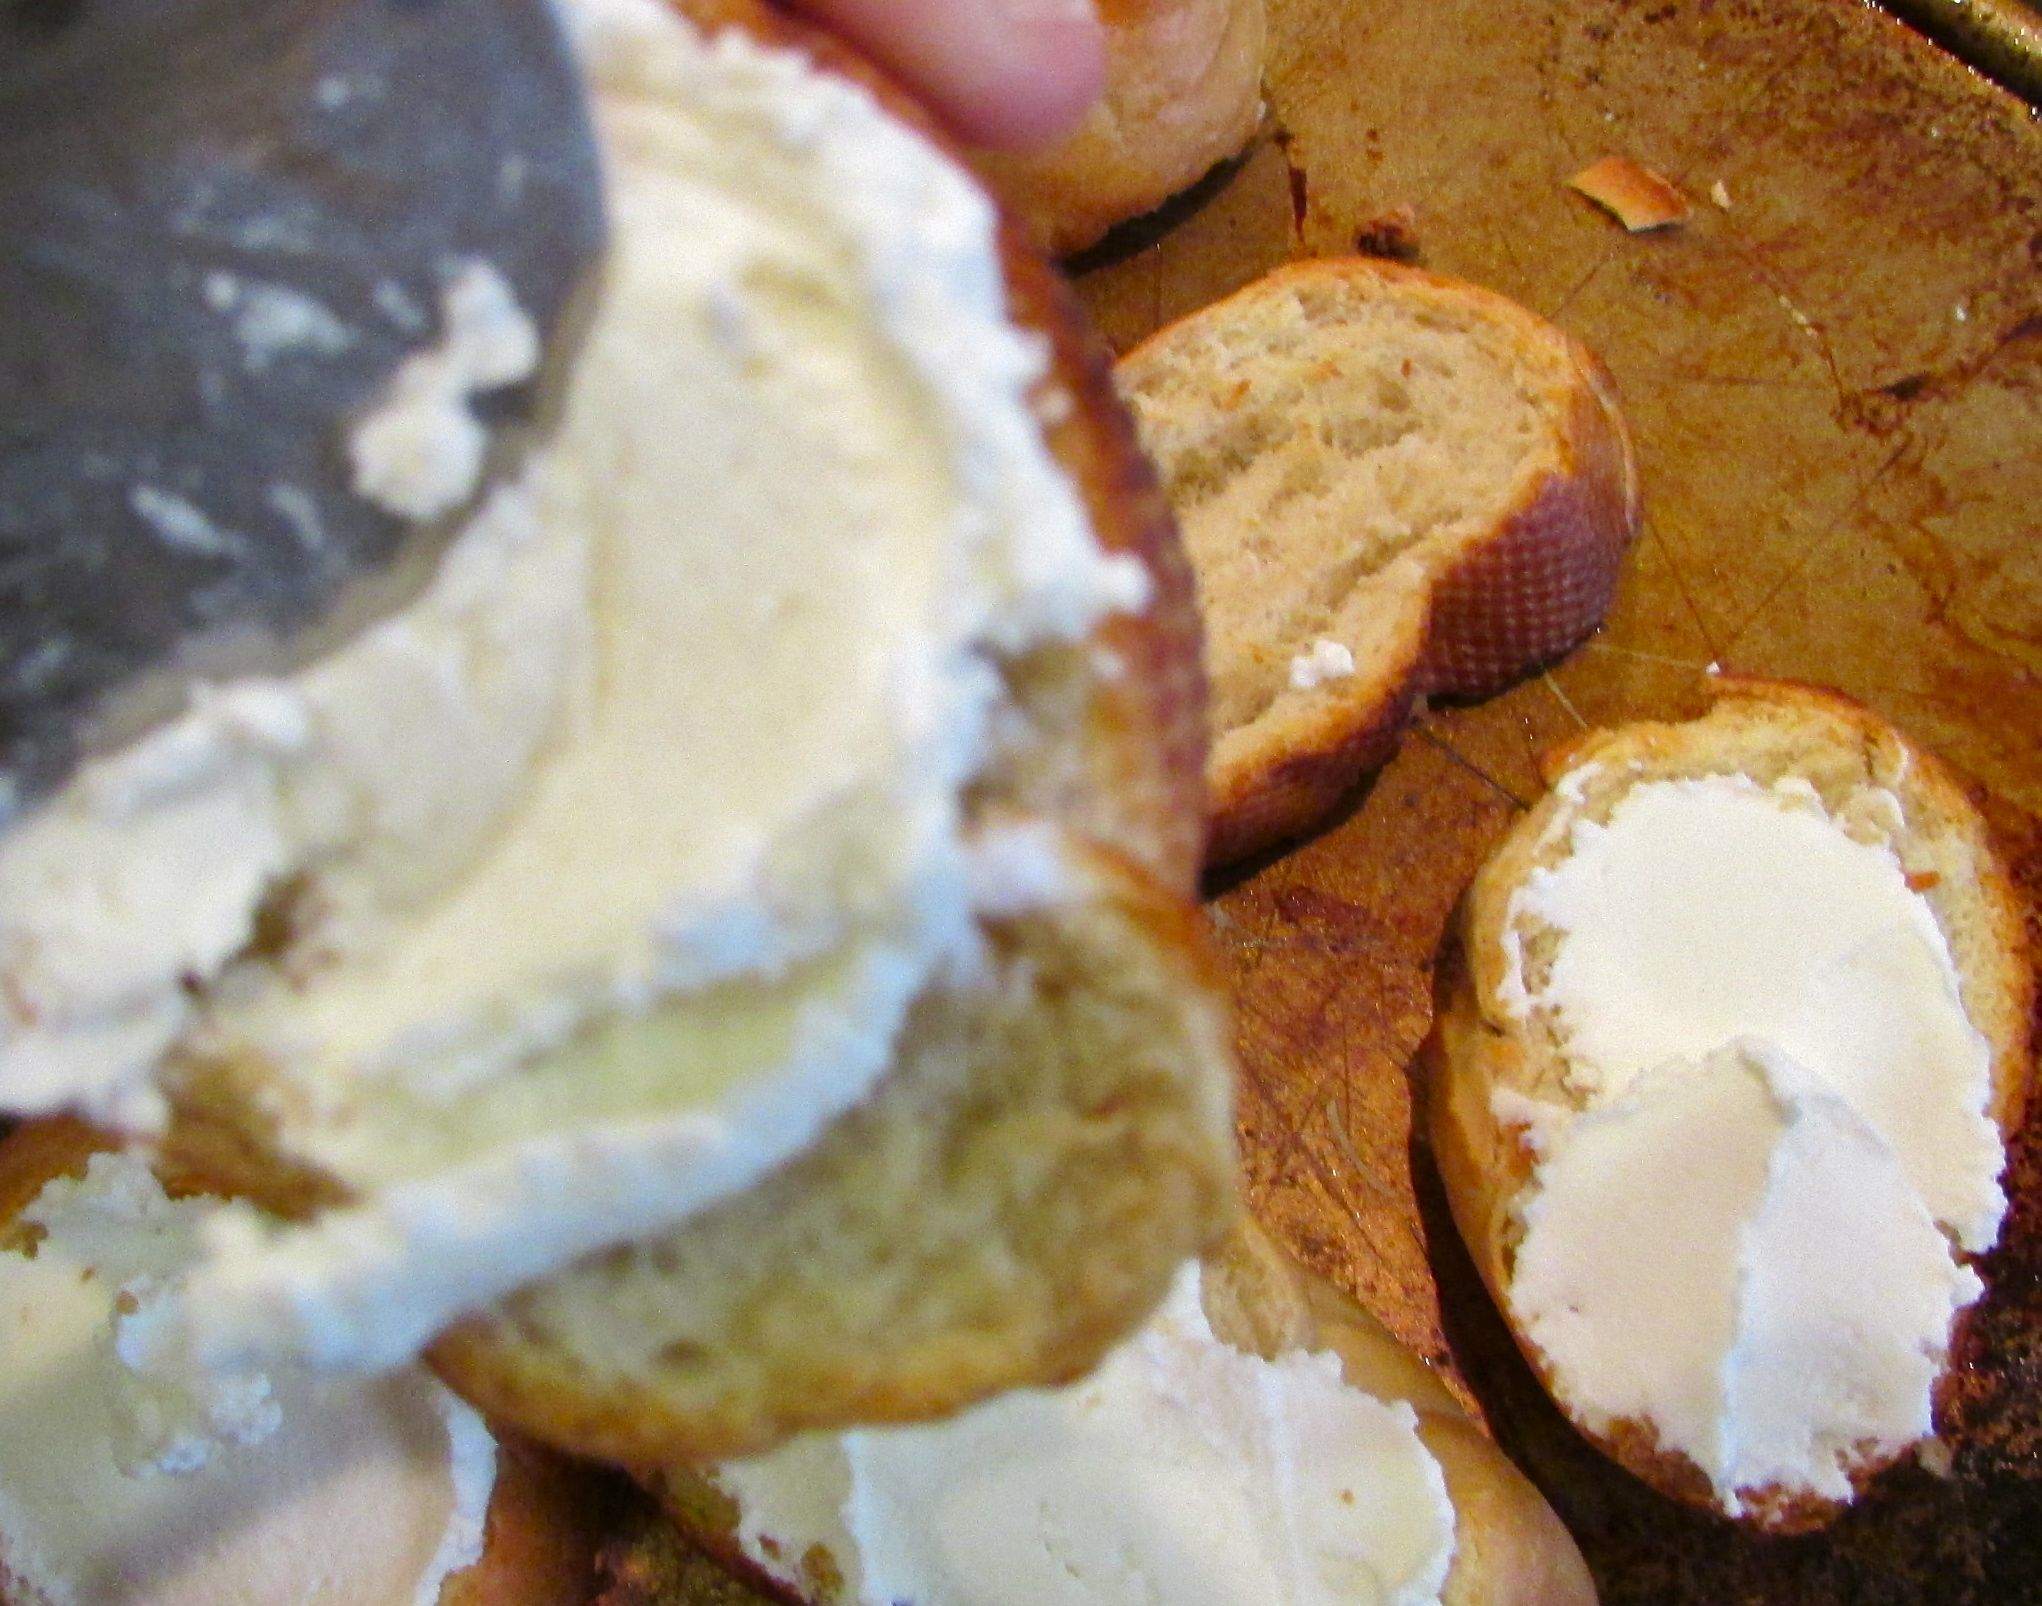
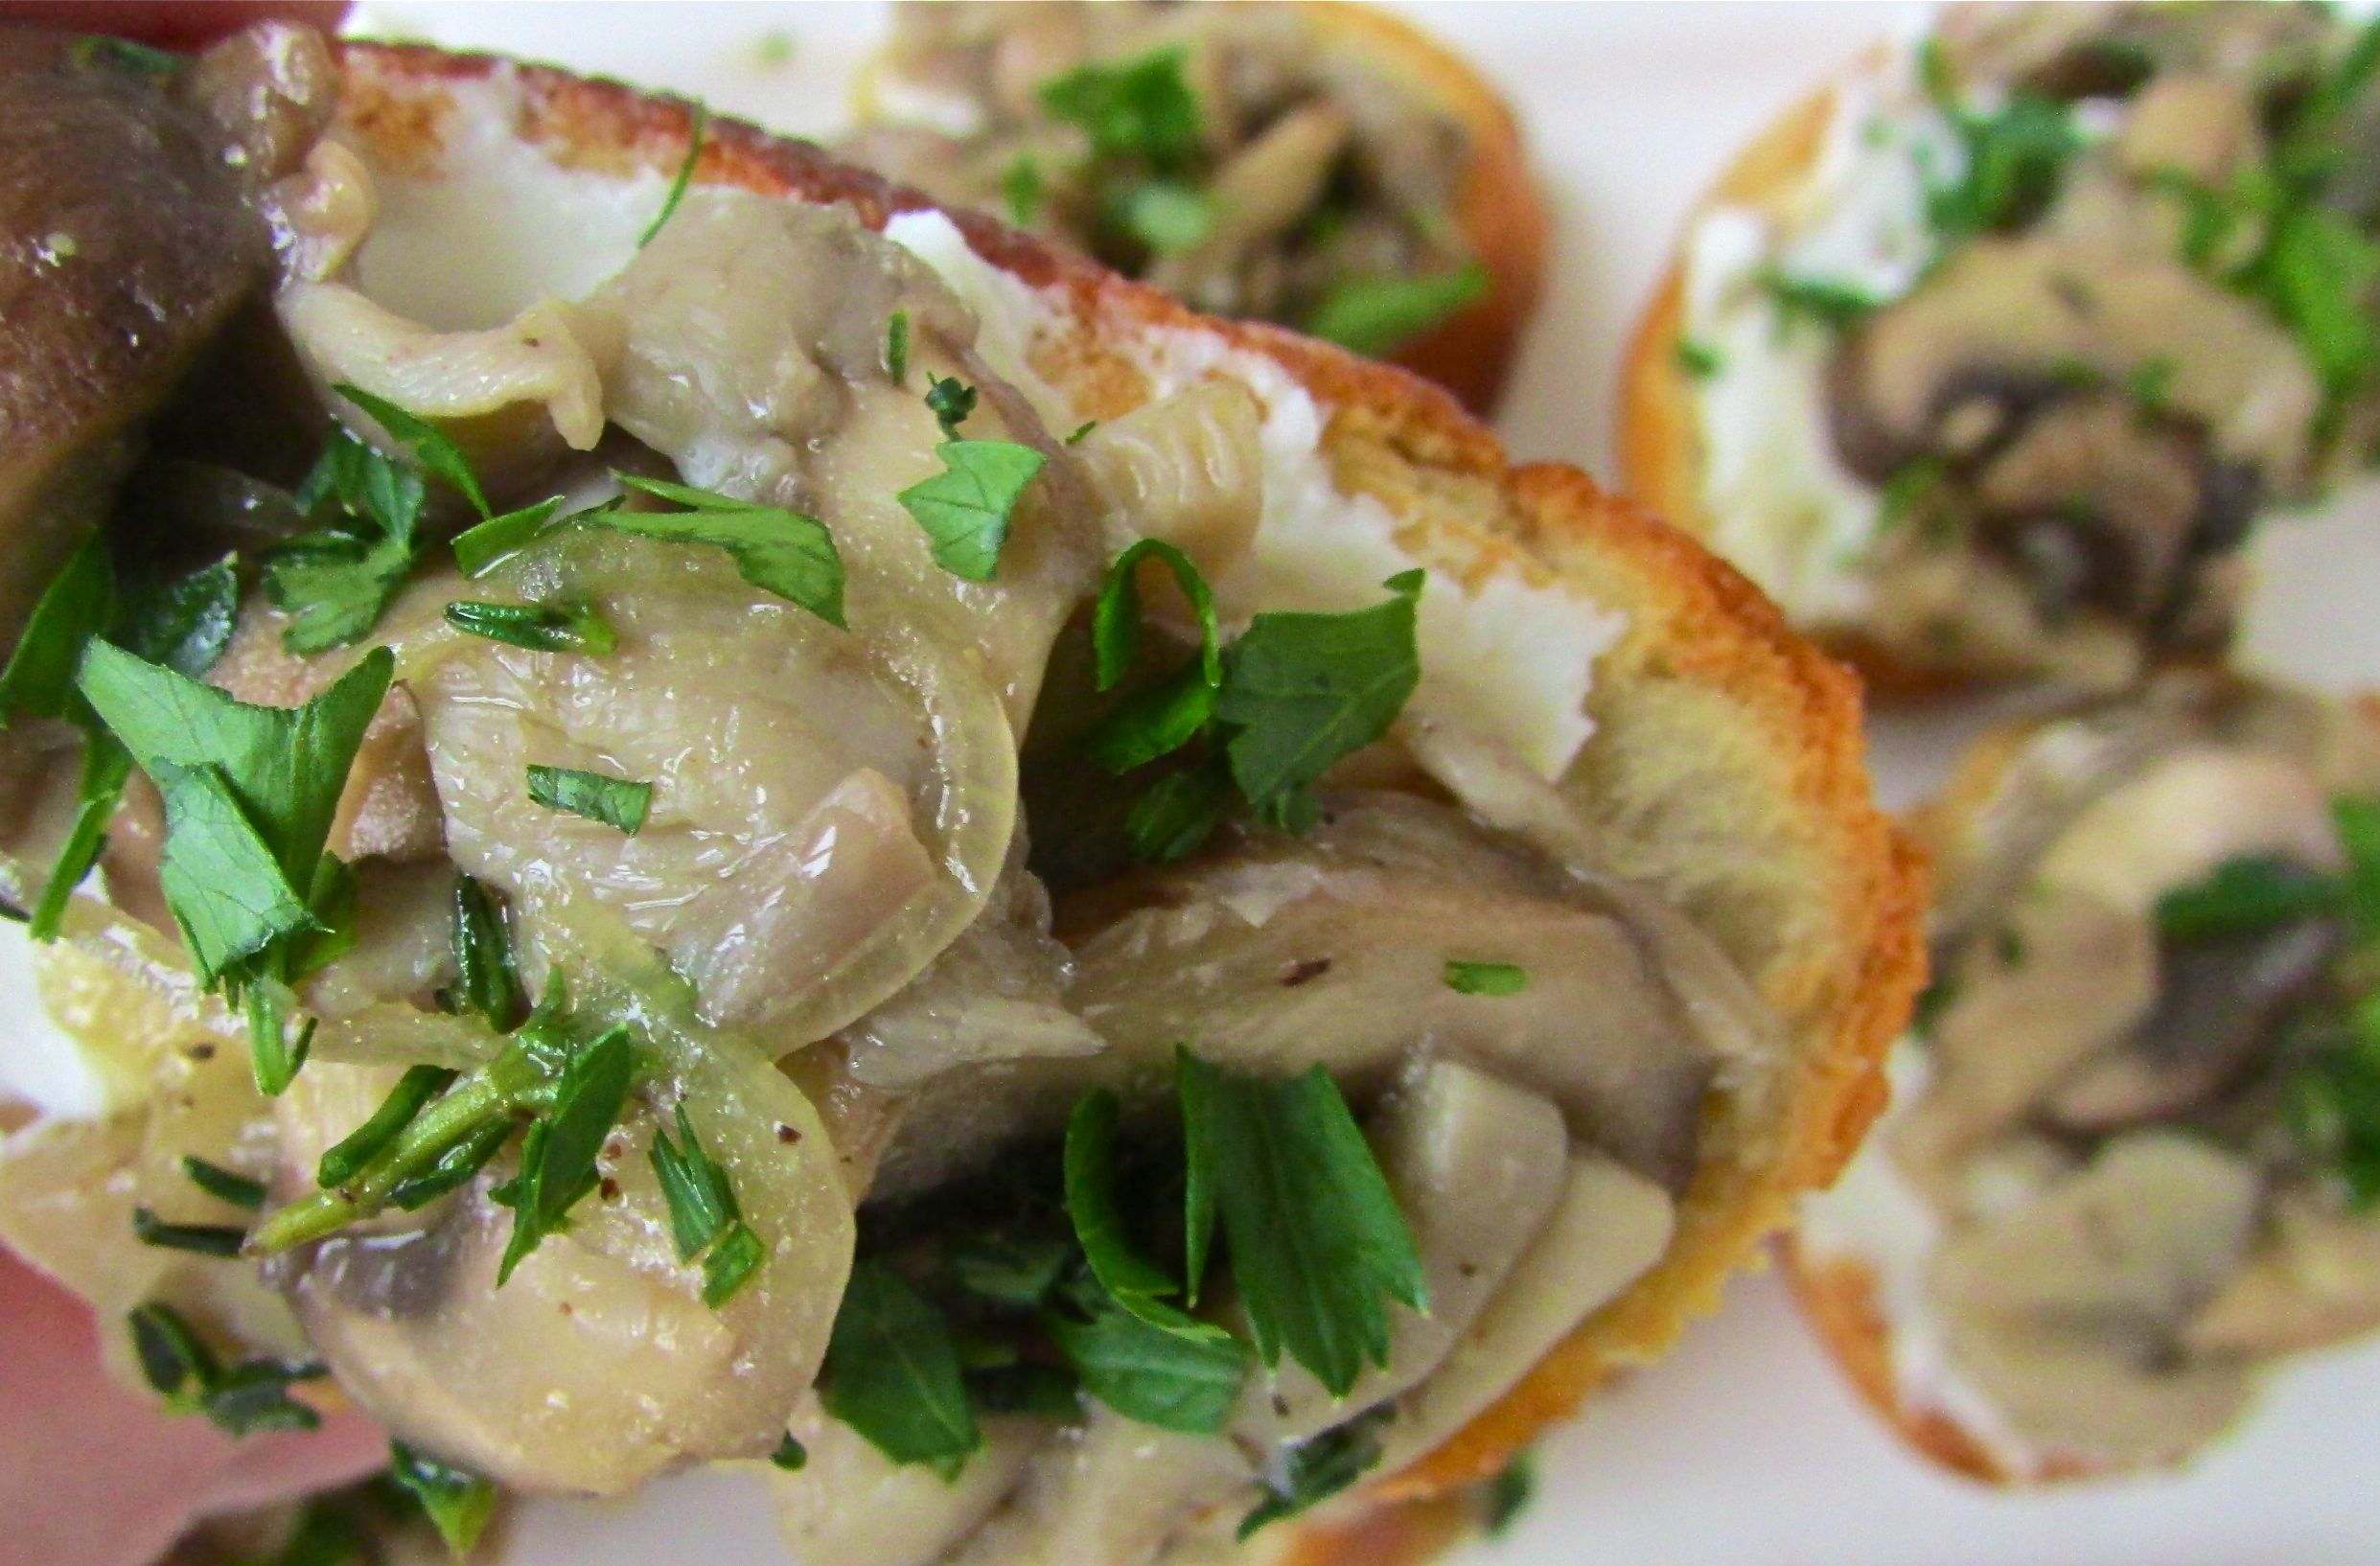
Put the toasts together – slather a good layer of the goat cheese on toasted French bread slices, top with the warm mushroom mixture and sprinkle with parsley.

Here's a shot of the 'toasts' - makes a nice app or first course, maybe for an Oscar party?

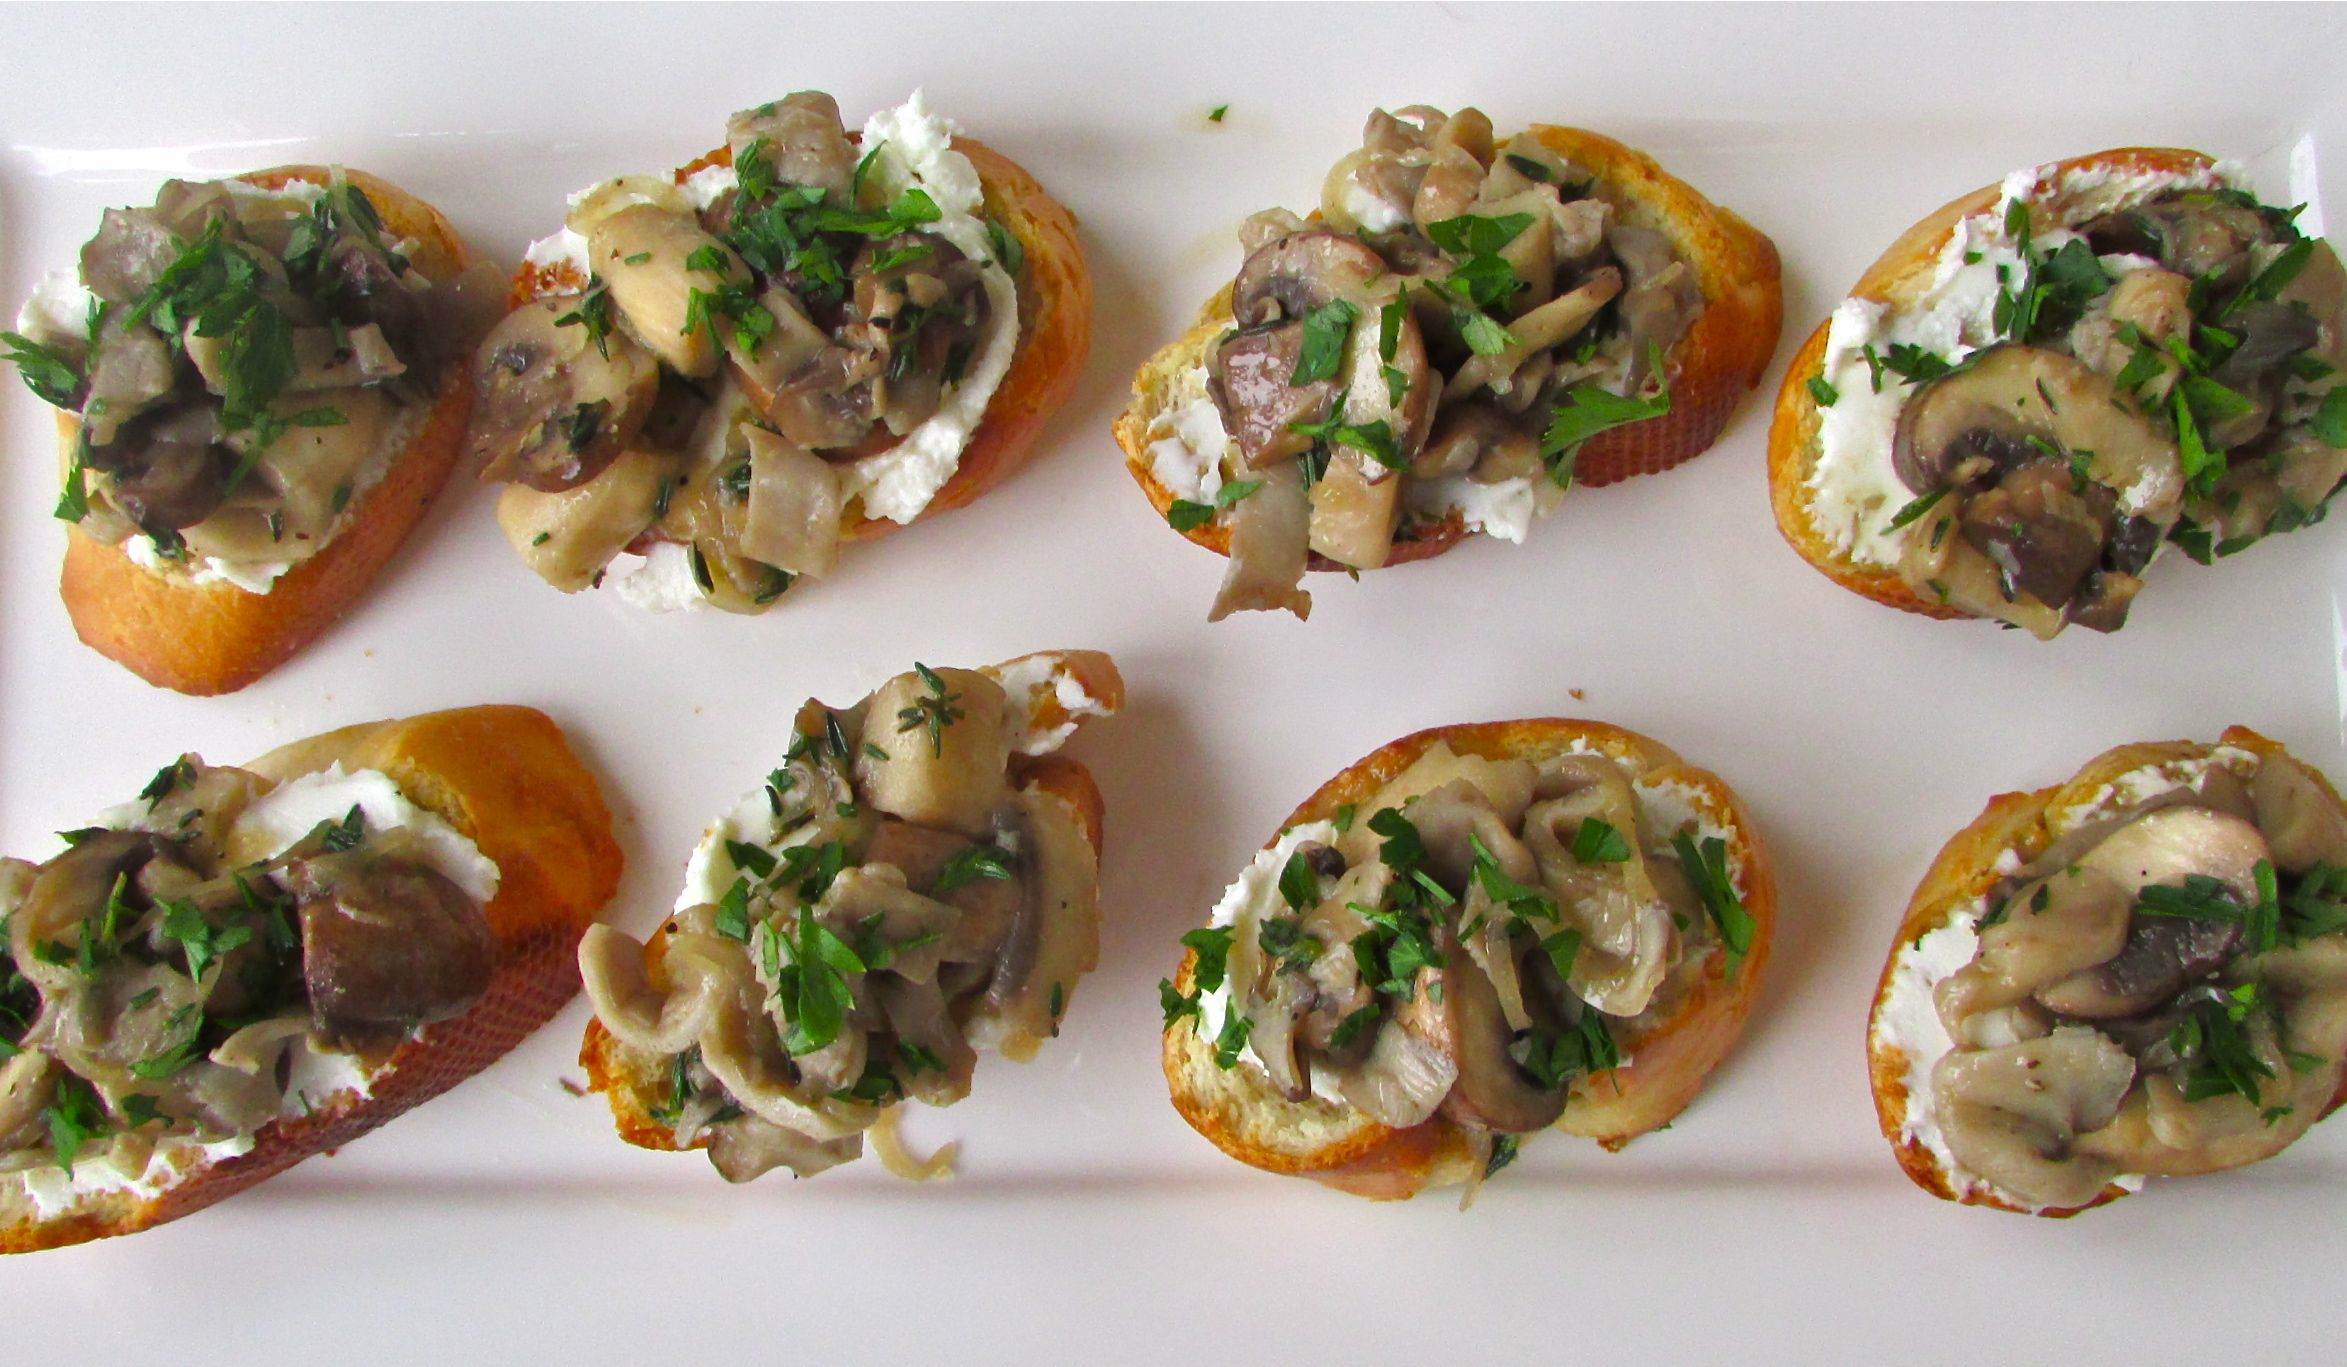
Here’s a shot of the ‘toasts’ – makes a nice app or first course, maybe for an Oscar party?

Makes me hungry - hope my second harvest of oyster mushrooms is as wonderful as the first!

Hungry yet? I am. Here’s to a bountiful second harvest of oyster mushrooms!

Mushroom and Goat Cheese “Toasts”
Mustards Grill Napa Valley Cookbook

  • 2 tbl extra virgin olive oil
  • 2 tbl butter, divided
  • 2 shallots, sliced paper thin
  • 4 cups fresh mushrooms, cleaned and chopped/sliced
  • Salt and freshly ground pepper
  • 2 teaspoons fresh thyme, minced
  • ¼ cup Madeira, Calvados, Cognac or Applejack
  • ¼ cup goat cheese
  • 2 tablespoons cream or half&half
  • 12 round slices of French or rustic bread, toasted
  • ¼ cup fresh minced parsley

Heat the olive oil and 1 tbl butter in a sauce pan over medium heat. Sauté the shallots until transparent – about 2 minutes. Add the mushrooms and sauté another 5-7 minutes, stirring occasionally. Pour in the Calvados or Applejack and stir to combine. Sprinkle with the thyme and season with salt and pepper. Remove form heat and stir in 1 tbl butter.

In a small bowl mix the goat cheese and cream until smooth. Spread each toast with a helping of goat cheese, top with warm mushroom mixture and sprinkle with parsley and serve at once.
Makes 4-6 servings.
Note: Any leftover mushroom mixture makes a superlative omelet filling or burger topping too!

Advertisement

It’s a Christmas miracle: sizzling grit cakes with rarified roast beef, creamy horseradish and Asiago.

sizzling grt cake with rare roast beef, asiago, horseradish

This year I prepared Christmas dinner, our first back in the Lowcountry. Over the week or so leading up to the big day I also made several of my usual holiday recipes – “fantasy” fudge (yes, I use jarred Fluff), cut out cookies (Martha Stewart recipe) and I dry-aged a well marbled, choice rib roast. This is about the sixth time I have attempted the ‘dry aging’ treatment on a rib roast, and I think it came out the best ever this year – rarified beef indeed!

I like rib roast or lamb for Christmas dinner, ham for Easter and turkey for Thanksgiving. But I am not one to be overly traditional, so if I have some duck or even a nice venison tenderloin, either would be more than satisfactory for such an occasion as Christmas dinner. This year, though, it was rib roast. I aged it for 72 hours following the method of Alton Brown. I have a leave-in digital meat thermometer and it served its purpose perfectly. We enjoyed a wonderful rib roast cooked rare/medium rare as our main course and I happily packed a decent portion back into the frig afterwards.

Apparently I also had my thinking cap on this Christmas as I made a pot of grits Christmas morning for my daughter and myself (Dear Hubby still insists he doesn’t like grits) and I made extra for grit cakes. Now, I use the term ‘cake’ loosely as the congealed, sliced grits are not at all the consistency of a cake and that’s just how I like them. I’ve had restaurant grit cakes that are heavier than mine, and can be used almost like a cracker…or a hockey puck. Personally I like grit cakes to taste great, not just serve as a miniature, flavorless ‘plate’ for holding toppings. So my grit cakes are not portable – they need to be served warm, on a plate them selves and accompanied by a fork.

So, I have my grit cakes and I have my rare, tender roast beef. I also saved the bacon drippings from the Christmas morning breakfast. Easy enough to pair the roast beef with some horseradish (and I have a jar in the frig!). What else would be delicious with this combo? I do have a hunk of Asiago in the cheese drawer…I wonder?

But I did more than wonder. I put myself back to work in the kitchen to make these ‘snackies’. Leftovers never tasted so good! But that is not the miracle.Read on…

Dear Hubby noticed the aroma of bacon and asked, “What are you making?” I replied, “Oh just something for the blog.” He then heard the frying pan sizzling and saw me shaving some Asiago cheese. As he sat down with a glass of ale from his growler (a gift from me) I asked if he was up for taste testing. He said, “Sure!” and I lifted a fork to his mouth, casually mentioning that there were grits involved. But it was to late for him to resist, as all the flavors on the fork were already melding together in his mouth. I heard him fight back a “yumm” type sound as I wistfully asked, “What do you think? Do you like it? Think it’s good enough for the blog?”

His reaction of “Yes, it’s good.”  but included little enthusiasm. In a few minutes I added, “I can make some more up on a plate…if you’d like.” Surprisingly he answered, “Okay.” I proceeded to make him two more small plates. As I sat eating a few bites myself, he added, “This is definitely ‘blog worthy’. It’s really quite good”.

So as my Dear Hubby scraped the last morsel off his plate I thought, “Christmas is truly a time for miracles!” After almost 8 years of the ‘no grits, no way, no time’ I’ve broken through the no grits barrier, once as stubborn as the overcooked, leftover grits in the bottom of a thin, aluminum pot.

These grits may be slathered in bacon grease and topped with tender beef and tangy Asiago, but they’re still grits… and as the state of South Carolina wrote in 1976 when grits was declared the official state food:

Whereas, throughout its history, the South has relished its grits, making them a symbol of its diet, its customs, its humor, and its hospitality, and whereas, every community in the State of South Carolina used to be the site of a grist mill and every local economy in the State used to be dependent on its product; and whereas, grits has been a part of the life of every South Carolinian of whatever race, background, gender, and income; and whereas, grits could very well play a vital role in the future of not only this State, but also the world, if, as The Charleston News and Courier proclaimed in 1952: ‘An inexpensive, simple, and thoroughly digestible food, [grits] should be made popular throughout the world. Given enough of it, the inhabitants of planet Earth would have nothing to fight about. A man* full of [grits] is a man of peace.’


As for me, I’ll take this little ‘miracle’. May the grits of peace be with you and happy holidays!

* or woman

dry aged rib roast

Here is the leftover dry-aged rib roast.

dry aged beef rib roast slices

Slice the rib roast when it is cold and then allow the slices to reach room temperature (or almost).

grit slices, grit cakes

Slice the congealed grits into about 1/2 inch thick slices. You could also use ramekins or even a large loaf pan. If doubling the recipe, use a lined and oiled jelly roll pan.Then just cut out squares of grits.

Brown the grits slices in bacon grease (or butter or a high heat oil like grape oil). However use a NONSTICK pan. Believe me, you'll be glad you did.  Also clear away children from the immediate cooking area and use a splatter screen!

Brown the grits slices in bacon grease (or butter or a high heat oil like grape oil). However, use a NONSTICK pan. Believe me, you’ll be glad you did. Also clear away children from the immediate cooking area and use a splatter screen!

grit cakes

Gently turn each grit cake over and allow to brown. Remove to a warm platter or individual plates. Then add more grease/oil/butter, heat the pan and brown up the rest of the grit cakes.

creamy horseradish sauce

Mix mayo with prepared horseradish and a few cracks of fresh pepper. Use homemade mayo or store bought. Of course my store brand of choice is Duke’s.

warm grit cakes with rare roast beef, horseradish cream and asiago.

Once all the parts of this ‘snackie’ are assembled put it all together: grit cake, then roast beef, a dollop of horseradish cream and a shave or two of Asiago cheese. That’s it!

Sizzling grit cakes with roast beef, creamy horseradish, and shaved Asiago cheese

  • 2 cups cooked grits (see my recipe)
  • vegetable cooking spray
  • 2 tbl bacon grease/drippings (or butter or grape oil)
  • tender roast beef – cooked medium rare to rare (rib roast, beef tenderloin), chilled
  • 1/3 cup mayonnaise
  • 1 ½ tsp prepared horseradish
  • several cracks of fresh pepper
  • shaved Asiago cheese

Prepare grits per my previous recipe or as you see fit. The grits should be on the thick side (rather than thin and runny). Prepare two mini loaf pans, round ramekins or any container you think would make a good mould for sliced grits. Line pan(s) with foil and spray lightly with oil.

Pour half the warm, cooked grits into each pan and set in the refrigerator to congeal. Cover ad allow to cool completely – at least 2 hours or overnight.

Meanwhile cut small, very thin slices of beef from the cold roast beef. Set aside shaved roast beef to allow it  reach room temperature (or close to it). In a small bowl mix the mayo, horseradish and cracked pepper. Feel free to adjust the amount of horseradish to your taste. Set aside.

When grits have congealed, remove from the ‘moulds’ and slice into ½ inch thick pieces. Heat 1 tablespoon bacon grease in a non-stick sauté or frying pan to very hot (but not smoking). Add half the sliced grits and cook for about 2 minutes per side or until a nice crust has formed. Note that the grits will sputter and pop so using a  frying screen will help protect your arms and hands as tiny, sizzling hot grits will fly at you. Remove the grit slices to plates and keep warm while you finish frying the rest of the sliced grits with 1 more tablespoon of bacon grease (or butter or grape oil).

Plate this up with 3 slices per person as a first course: top each grit cake with roast beef, then a dollop of horseradish mayo and then a shave of Asiago cheese. Serves 4 with 3 slices per person. This recipe can be doubled.

Groov’in with crab and chutney triangles.

My first encounter with Phyllo dough was probably way back at the Elite Epicurean Restaurant when we ended our meal with that now common Greek specialty, Baklava. Being about 12 or 13, I remember thinking Baklava was the bomb not just because it was loaded with walnuts and honey, two of my favorite things, but because of those impossibly thin layers of Phyllo pastry.

Being the budding baker that I was, I had to find out how it is made. I think I looked it up in the Encyclopedia Britannica (yes, a set of real books) and found out that Greek ladies passed the technique down “through the ages” rolling out that dough by hand to the point of translucency. I set about trying to make Phyllo on more than one occasion but like my attempts at homemade puff pastry, fell short on technique, arm strength and table space. I do remember my older sister Jeannie making baklava herself though, informing me that she just bought the frozen Phyllo dough sheets at the grocery store. What!?!

On the humanity! I wanted to be like the old Greek ladies and make everything from scratch, pulling and stretching dough. Of course there were aspects involved in making Phyllo at home that my young mind had not taken into account. Like the humidity – Greece is, well, dry and arid for the most part, and Columbia, SC is most definitely, NOT. The Greek ladies not only had years of experience – passed down since the time of Aristotle, for goodness sake – but their process was also a group effort with lots of hands put to work, not just two.

Needless to say, I gave up on making Phyllo dough myself and buy the commercially made kind like everyone else in the world – including those old Greek ladies – who mostly likely stopped making their own Phyllo years ago, too.

Working with Phyllo dough still requires a deft touch and some patience, as it can tear if you look at it the wrong way, and as stated above, it can dry out and crack within seconds. It is worth it to buy extra if you are new to  working with Phyllo, and also prepare your work area including the damp towels, the filling and any oil or melted butter, basically have your ‘mise en place’ – in place – prior to even opening the Phyllo package.

This recipe uses fresh crab (blue crab that is native to the Lowcountry) and the peach chutney with cherry, which I posted several weeks ago. It can be easily doubled and the finished triangles freeze well. Once you start making the triangles, the process goes quickly – might as well make a bunch while you’re in the Phyllo “groove”.

Ingredients for the triangles, including fresh crab, peach chutney, Gouda cheese and yes, Phyllo dough sheets.

Mix all the filling ingredients together.

The filling will look like this. The chutney is chunky so make sure it is distributed throughout the batch of filling.

Keep the Phyllo from drying out. I lay it on a damp kitchen towel and another one (or a paper towel) on top. The towels should be damp but not soaking wet – otherwise the Phyllo will become mush.

Butter the layers that you are working with. Be gentle as the Phyllo can tear easily.

Cut the buttered Phyllo sheets into 3 long strips and place a small dollop of filling on one end.

Start by folding one corner down and over the filling to make a triangle shape.

The triangle shape coming together…

Lined up triangles ready to either bake or freeze.

Crispy, warm and umhhh good.

Crab and chutney triangles

  • 1 cup fresh crab, picked over
  • ½ cup Gouda cheese, finely shredded
  • 4 oz. cream cheese, softened
  • 2 Tbl green onion tops, minced
  • ½ cup mayonnaise
  • 2 heaping Tbl chutney, preferably homemade
  • juice of ½ lime (approx. 1 tsp.)
  • 2-3 cracks of fresh pepper (approx. ½ tsp)
  • 1/8 tsp salt
  • ½ package Phyllo dough sheets
  • 2-3 Tbl butter, melted

Mix first 9 ingredients together; making sure the chutney is well distributed throughout.

Preheat oven to 425 degrees if you want to bake the triangles now. Line 2 cookie sheets with parchment paper.

Remove 1 package of Phyllo dough from the wrappings and lay flat on a clean, damp (but NOT soaking wet) dishtowel. Also have another slightly damp dishcloth or large paper towel ready to place over the top of the Phyllo dough sheets. The Phyllo dough sheets will dry out very quickly so they must be covered at all times.

Lay one Phyllo sheet out in front of you and quickly brush lightly with butter. Lay another sheet on top of this one and brush with butter. Using a sharp knife make evenly two spaced cuts down the long side of the dough sheets. You will have 3 long strips of Phyllo dough. Be sure to cover up the remaining full sheets of Phyllo as you work.

Place 1 heaping teaspoon of filling at the top of each dough strip. Fold the corner above the filling down to make a triangle shape. Proceed with turning the dough down in this triangle shape until you reach the end of the dough strip. If necessary, use a tad of melted butter to “seal” the last bit of dough on each triangle.

Proceed with this technique using all the filling. You can either bake these now – about 10-12 minutes in a preheated 425 degree oven or  freeze the triangles on trays for an hour or so, then remove to a sealed plastic bag or container. I have kept these frozen for up to two weeks. When ready, simple bake the frozen triangles on parchment or oiled baking sheets in a preheated 425-degree oven for 15-18 minutes – no need to thaw. Can be easily doubled if you need triangles for a crowd.

Serve hot. Makes about 2 dozen triangles.

Lovely and amazing: fresh fig stuffed with pecan, chevre and honey

It has certainly been quite the chore finding figs this summer, but I am happy to report that I did find a few of the brown turkey variety last week. Unfortunately this was not enough to make preserves, obviously, and just devouring the whole lot by myself seemed, well, downright selfish. So, I decided to prepare these fresh beauties one of my favorite ways, stuffed with chèvre and toasted pecans and lightly roasted. A flourish of local honey drizzled over the top adds a touch of sweetness. Fresh figs do not need much in the manner of fussy accompaniments or tricky preparations, and I was not about to mess up the delicate flavor of my few precious figgy fruits.

This recipe make both a tasty appetizer or a light dessert. You can use plain goat cheese or a flavored one, like the honey infused variety I used here. I adore pecans and pairing them with figs just seemed the right fit, if you know what I mean. But walnuts are good too. I enjoyed these figs with a Pinot Noir, but I would think that most any light to medium bodied wine (red or white) would pair well with this recipe.

Fresh figs – these are brown turkey, probably the most common variety grown here in the South.

Ingredients of four: figs, goat cheese, pecans and honey.

Step 1: Mix the toasted nuts and the softened cheese.

Step 2: Slice the figs in a cross across the top but not all the way through the fruit.

Line the figs up on an oiled baking sheet.

Step 3: Stuff each fig with a bit of the pecan/cheese mixture and roast for a few minutes in a preheated oven.

Step 4: Remove the roasted figs from the oven onto a platter and drizzle with honey. Snappity snap, there you go!

Simple Stuffed Fresh Summer Figs

  • Large fresh, ripe figs (at least 12)
  • 1 – 4 oz package chevre (goat cheese) regular or honey-infused
  • 1/3 cup toasted and finely chopped pecans or walnuts
  • Warm honey (1/4 – 1/3 cup)
  • Vegetable oil – I use grape oil

Preheat oven to 425°. Wash and dry figs. Lightly oil a baking dish. In a small bowl mix the goat cheese and nuts. Quarter the figs, cutting three-quarters of the way down (but not all the way through). Stuff each fig with the cheese/nut mixture. Bake the figs in the oven about 6-7 minutes. Remove and drizzle with the warmed honey. Serves 4.

Welcome Back, Mr. Crab!

Summer has arrived here in South Carolina in all its humid glory. While I am not too keen on 60%+ humidity, the warm tropical temps do have at least one very positive effect – male blue crabs are getting plumper as they fill up the local saltwater marshes. Catching blue crabs by hand off the dock is a summer pastime I learned on weekend jaunts to my aunt’s beach house in Garden City, SC.

That beach house saw a lot in its time, many fish stories told, re-enacted and perpetuated by members of my family. Everyone I know has at least one to tell, even if it they weren’t witness to the actual fish-story generating event.

Blue crabs, sure they’re interesting looking but they are fun to catch and delicious to eat. Watch out for the pinchers!

My personal favorite involves a 30-gallon trash can full of shrimp and some wily blue crabs caught by my Dad, uncle and older cousins in a large seine net in the creeks around our beach house. I’ll never forget almost losing my finger to one of those testy crabs when I reached into the shrimp container and then made the belated realization that I had made a very poor choice! Instantaneously, I felt panic and pain as that voracious blue caught hold of my finger. My ensuing scream heard ‘round Garden City Beach’ was followed by howls of laughter from my brother as I flung the crab across the dock where it landed squarely at my Mother’s feet. I’ll admit that it took a couple of summers to participate in catching blues again following the “crab incident”. However, these days I do take great pleasure (revenge?) in every crab crack, crab cake and crab casserole set in front of me.

Now I know you may think, 30-gallon trash cans full of shrimp and crabs? We need a fact check here. But yes, the waters along the entire coast of South Carolina are brimming with blue crabs, shrimp, oysters and flounder for the taking. Back in the day (the ‘70’s in my case) all you needed was a permit, the right equipment and some local insider knowledge to catch the limit. Today, while you may not be up for pulling a net through 3 feet of pluff mud or setting crab pots you can visit your own local seafood market. Look for a product that was caught as close to your own town/state/area of the country as possible. I was recently informed that there are no commercial crab packing facilities in SC any longer – although there are plenty of commercial “crab men” – the picking and packing is done in NC. So you may have to ask where the crab was caught, but do ask, as any good seafood market would be happy to oblige. (If they do not, I would propose buying from a different source.)

Here’s my standby recipe for crab cakes. No real secrets involved, however, I will suggest using your own freshly made breadcrumbs as well as fresh lemon juice and parsley. Here I topped them with a cold lemon dill sauce – recipe below. You can even freeze them for up to a week, so it’s a delectable, do-ahead appetizer for a party. Just freeze them on a lined cookie sheet and transfer to a large bag or plastic container (with a good sealing lid) after they harden and freeze. Easy, peasy!

Fresh blue crab, picked out by ‘moi’ just a couple of hours earlier. Less than 24 hours before this picture was taken these crabs were footloose and fancy free in a nearby marsh, now they are dinner. There is some work involved but not as much sacrifice as those ‘blues’…so thanks to them we get to eat crab cakes tonight. Hurray!

All the ingredients, sort of… you will actually need some more bread crumbs as well as the ingredients for the lemon dill sauce (lemon, mayo & dill).

I know this is a boring image but you have to start somewhere…whisk the eggs first in the one bowl you need for making these crab cakes. Then…

add all the other ingredients except the butter. Mix together and chill. I only used a 1/2 teaspoon of hot sauce as we needed ‘family-friendly’ crab cakes but feel free to add more if you like spicy.

Here is the crab cake ‘batter’. Cover and chill for at least an hour.

Coat each crab cake in fine bread crumbs. I only use fresh bread crumbs that I make in my mini food processor, never canned breadcrumbs. Go light on the bread crumbs.

Here they are, ready for the big chill. If you want you can freeze them at this point on the baking sheet. When frozen solid remove to an airtight bay or container.

After they chill, bake in a preheated 400 degree oven. Flip them over once and bake another few minutes (exactly depends on the size). I baked these 8 minutes per side.

Fresh out of the oven. I find baking the crab cakes – instead of frying – still gives me a crispy crust but is lighter tasting (not greasy) and better for you, I would think. It’s all about the crab!

Okay, so this product, a refrigerated herb by Gourmet Garden is really the bomb. I do not have room to grown fresh dill and buying it is too expensive so this works great. A tube will last me a couple of months and I’m not throwing out old withered herbs – waste makes me c-r-a-z-y. They make other ‘flavors’ but the dill is the one I have used.

Carolina Crabcakes

  • 1 lb. of crabmeat
  • 2/3 cup + extra, fine breadcrumbs
  • ½ cup sweet bell pepper, finely chopped
  • 2 eggs
  • ½ tsp. salt
  • 1 tsp. dry mustard
  • 1 tsp. Worcestershire sauce
  • ½ tsp black pepper
  • ¼ cup fresh parsley, finely chopped
  • 1 tbl. fresh lemon juice
  • 1 tbl. butter
  • hot sauce, like Tabasco or Crystal, to your taste

In a medium bowl lightly whisk the eggs and all the other ingredients except the butter. Mix well, cover and refrigerate for at least 1 hour. Shape into crab cakes: 18-20 bite-size or 8 meal size. Coat each in extra fine bread crumbs lightly and place on a wax paper-lined  sheet pan. Chill another hour in the refrigerator (or pop into the freezer if you want to bake* them later).

Meanwhile preheat oven to 400 degrees. Melt 1 tablespoon butter in a cookie sheet to coat. Place crab cakes on the cookie sheet and bake for 2-3 minutes for mini crab cakes and 8 minutes for large crab cakes. Turn crab cakes over once and bake another 2-3 minutes for minis and 8 minutes for large ones. Serve immediately with rémoulade, tartar or my favorite, cold lemon dill sauce.

Lemon dill sauce: Mix ½ cup mayo with 1 heaping tablespoon chopped dill weed (fresh or  “Gourmet Garden” type) and juice of ½ a lemon. Chill until ready to serve.

* Frozen crab cakes will take a bit longer to bake, 1 more minute per side for the minis and 2 more minutes per side for the large.

[Remembering] a white Christmas in June with tasty shrimp dip

Even though summer isn’t official until June 20th, here along the coast of South Carolina we’ve had summer-like weather for a couple of months. School is out and a tropical storm passed within shout’ in distance in May. And while we haven’t landed any monster crabs yet off our community dock, local commercial shrimpers have been filling their nets for several weeks and a neighbor of ours hauled in a couple of beautiful red drum (known around here as redfish or reds) over the weekend.

Thinking about all this ocean bounty started me thing about…Christmas. Yes, I realize this makes no sense, as Christmas is in December and that means winter and cold weather (even here). Let me explain…

There are a few recipes for which I have a claim to fame, if you will. Well, I use the term ‘fame’ loosely, as the scope of my celebrité reaches the farthest corners of… family cookouts and neighborhood potlucks. Nevertheless, my shrimp dip is probably my most-requested dish.

This recipe goes back, way back – to 1989. It was created out of necessity and a snowstorm, if you can believe it. I was staying with one of my sisters and her family on the isle of Hilton Head and it was Christmas time. While I was supposed to head up to my parent’s home and my sister was supposed to travel to her in-laws in Pinehurst, NC the weather took an odd turn, with frigid temperatures and icy conditions shutting down parts of the Interstate 95 corridor. We could not travel so we went into emergency mode and stayed put at home

After running to the Piggly Wiggly on an emergency supply run, we settled in for a long winter’s nap and woke up to about 4 or 5 inches of the fluffy white stuff and no hot water. While the power was on, a pipe burst and we were without hot water. Oh well, we made due with what we had or were able to purchase the day before. My brother-in-law mentioned he had some shrimp fresh frozen so, “please try to make some kind of appetizer out it and whatever else you like.” Our family likes to snack but snack well, especially while we cook up the ‘main event’ for a holiday dinner. I was up to the challenge.

So I created this spread. The fresh parsley and lemon along with the shrimp really make this sing so I would not substitute or go for less than fresh on these items. Now I did state the shrimp were fresh frozen and they were tiny as well, if memory serves me. But they were locally caught, wild shrimp (not farmed) caught by my brother-in-law in month prior to being used in this recipe.

Letting the mixture sit makes a difference too. I made the inaugural concoction early in the day and it sat refrigerated for a few hours before being gobbled up, so the flavors had time to meld together. Lastly, I prefer noticeable chunks of shrimp in the dip so usually I roughly grind half the shrimp in the food processor and then chop the other half by hand to the perfect size – you’ll get shrimp in every bite!

This is a shrimp boat at the Bluffton Oyster Company. That big pile of shells are actually oyster shells, which will be recycled into paving and decorative building materials.

These are fresh, w-i-l-d shrimp for sale – yum! (This is Bluffton Oyster Company.)

A much smaller pile o’shrimp, ready to be lightly cooked.

Cooked shrimp have been drained and are ready to peel.

Chop the shrimp by hand or use a food processor – usually I use both so half the shrimp are finely minced and half are chopped.

I mix the cream cheese and mayo first and then add the other ingredients. I prefer homemade mayo but Duke’s is my first choice for store-bought.

Adding the hot sauce. I like Crystal or Tabasco but use your favorite!

Finally, fold in those delicious shrimp. Let the mixture rest in the refrigerator so the flavors meld – if you can keep your kids, your spouse, your friends and yourself from snatching samples!

Tasty Shrimp Dip

  • 1- 8 oz. package cream cheese, softened
  • ½ cup mayonnaise (preferably homemade)
  • 1 1/2 cups cooked shrimp, peeled with tails removed
  • 1 lemon
  • ¼ cup sweet onion (preferably Vidalia), grated
  • 1 large clove of garlic, minced or pressed
  • ½ cup fresh parsley, washed, dried and finely chopped
  • 2 tsp. Dijon mustard
  • 1 tsp. hot sauce
  • salt and pepper

Finely chop the cooked shrimp but do not pulverize. You can do this by hand or with a food processor. Grate the zest of the lemon and squeeze the juice and set aside. In a medium bowl mix all the ingredients together including the shrimp and the lemon except the salt and pepper. I suggest this order: Mix mayo and cream cheese until smooth. Then add onion, lemon zest and juice, garlic, and mustard. Mix in parsley and the hot sauce. Fold the shrimp in last. Taste the mixture, adding salt and pepper if you like.

Store in a covered bowl in the refrigerator at least 1 hour or up to 24 hours. Serve with crackers or toast points.