Crunchy southern-style mixed salad: Carrot “slaw”

carrot slaw on the plate
In life there are some people who just do not like certain things and when this phenomenon relates to food the term that comes to mind is “picky”. As a self proclaimed “foodie” it pains me that I must deal with someone in my life who is rather “picky”, as well as a 5-year-old. Now the 5 year-old enjoys steamed oysters and grilled salmon, so for someone her age I think she’s on the right track to appreciate most foods as she grows older.

But the other person in question is, ahem, my husband. And at the risk of causing hurt feelings in my marriage I will leave it at that. However, I will acknowledge that Dear Hubby has loosened up a bit about the foods he will try, i.e. sushi & sashimi, okra, and on occasion, tomatoes and grits.

However, when it comes to mayonnaise he slams the refrigerator door. So, I am reticent to make anything that obviously includes mayo in its ingredients AND expect him to eat it. I came up with the following recipe to provide something similar to southern-style coleslaw, which I like to pile on barbeque sandwiches (and sometime shot dogs!). It does not contain any mayo but lots of fresh veggies (and a fruit) in a piquant, lemony dressing. The addition of radish kicks up the spice so add more if you’re a radish-lover!

Beautiful organic and locally grown carrots and radish.

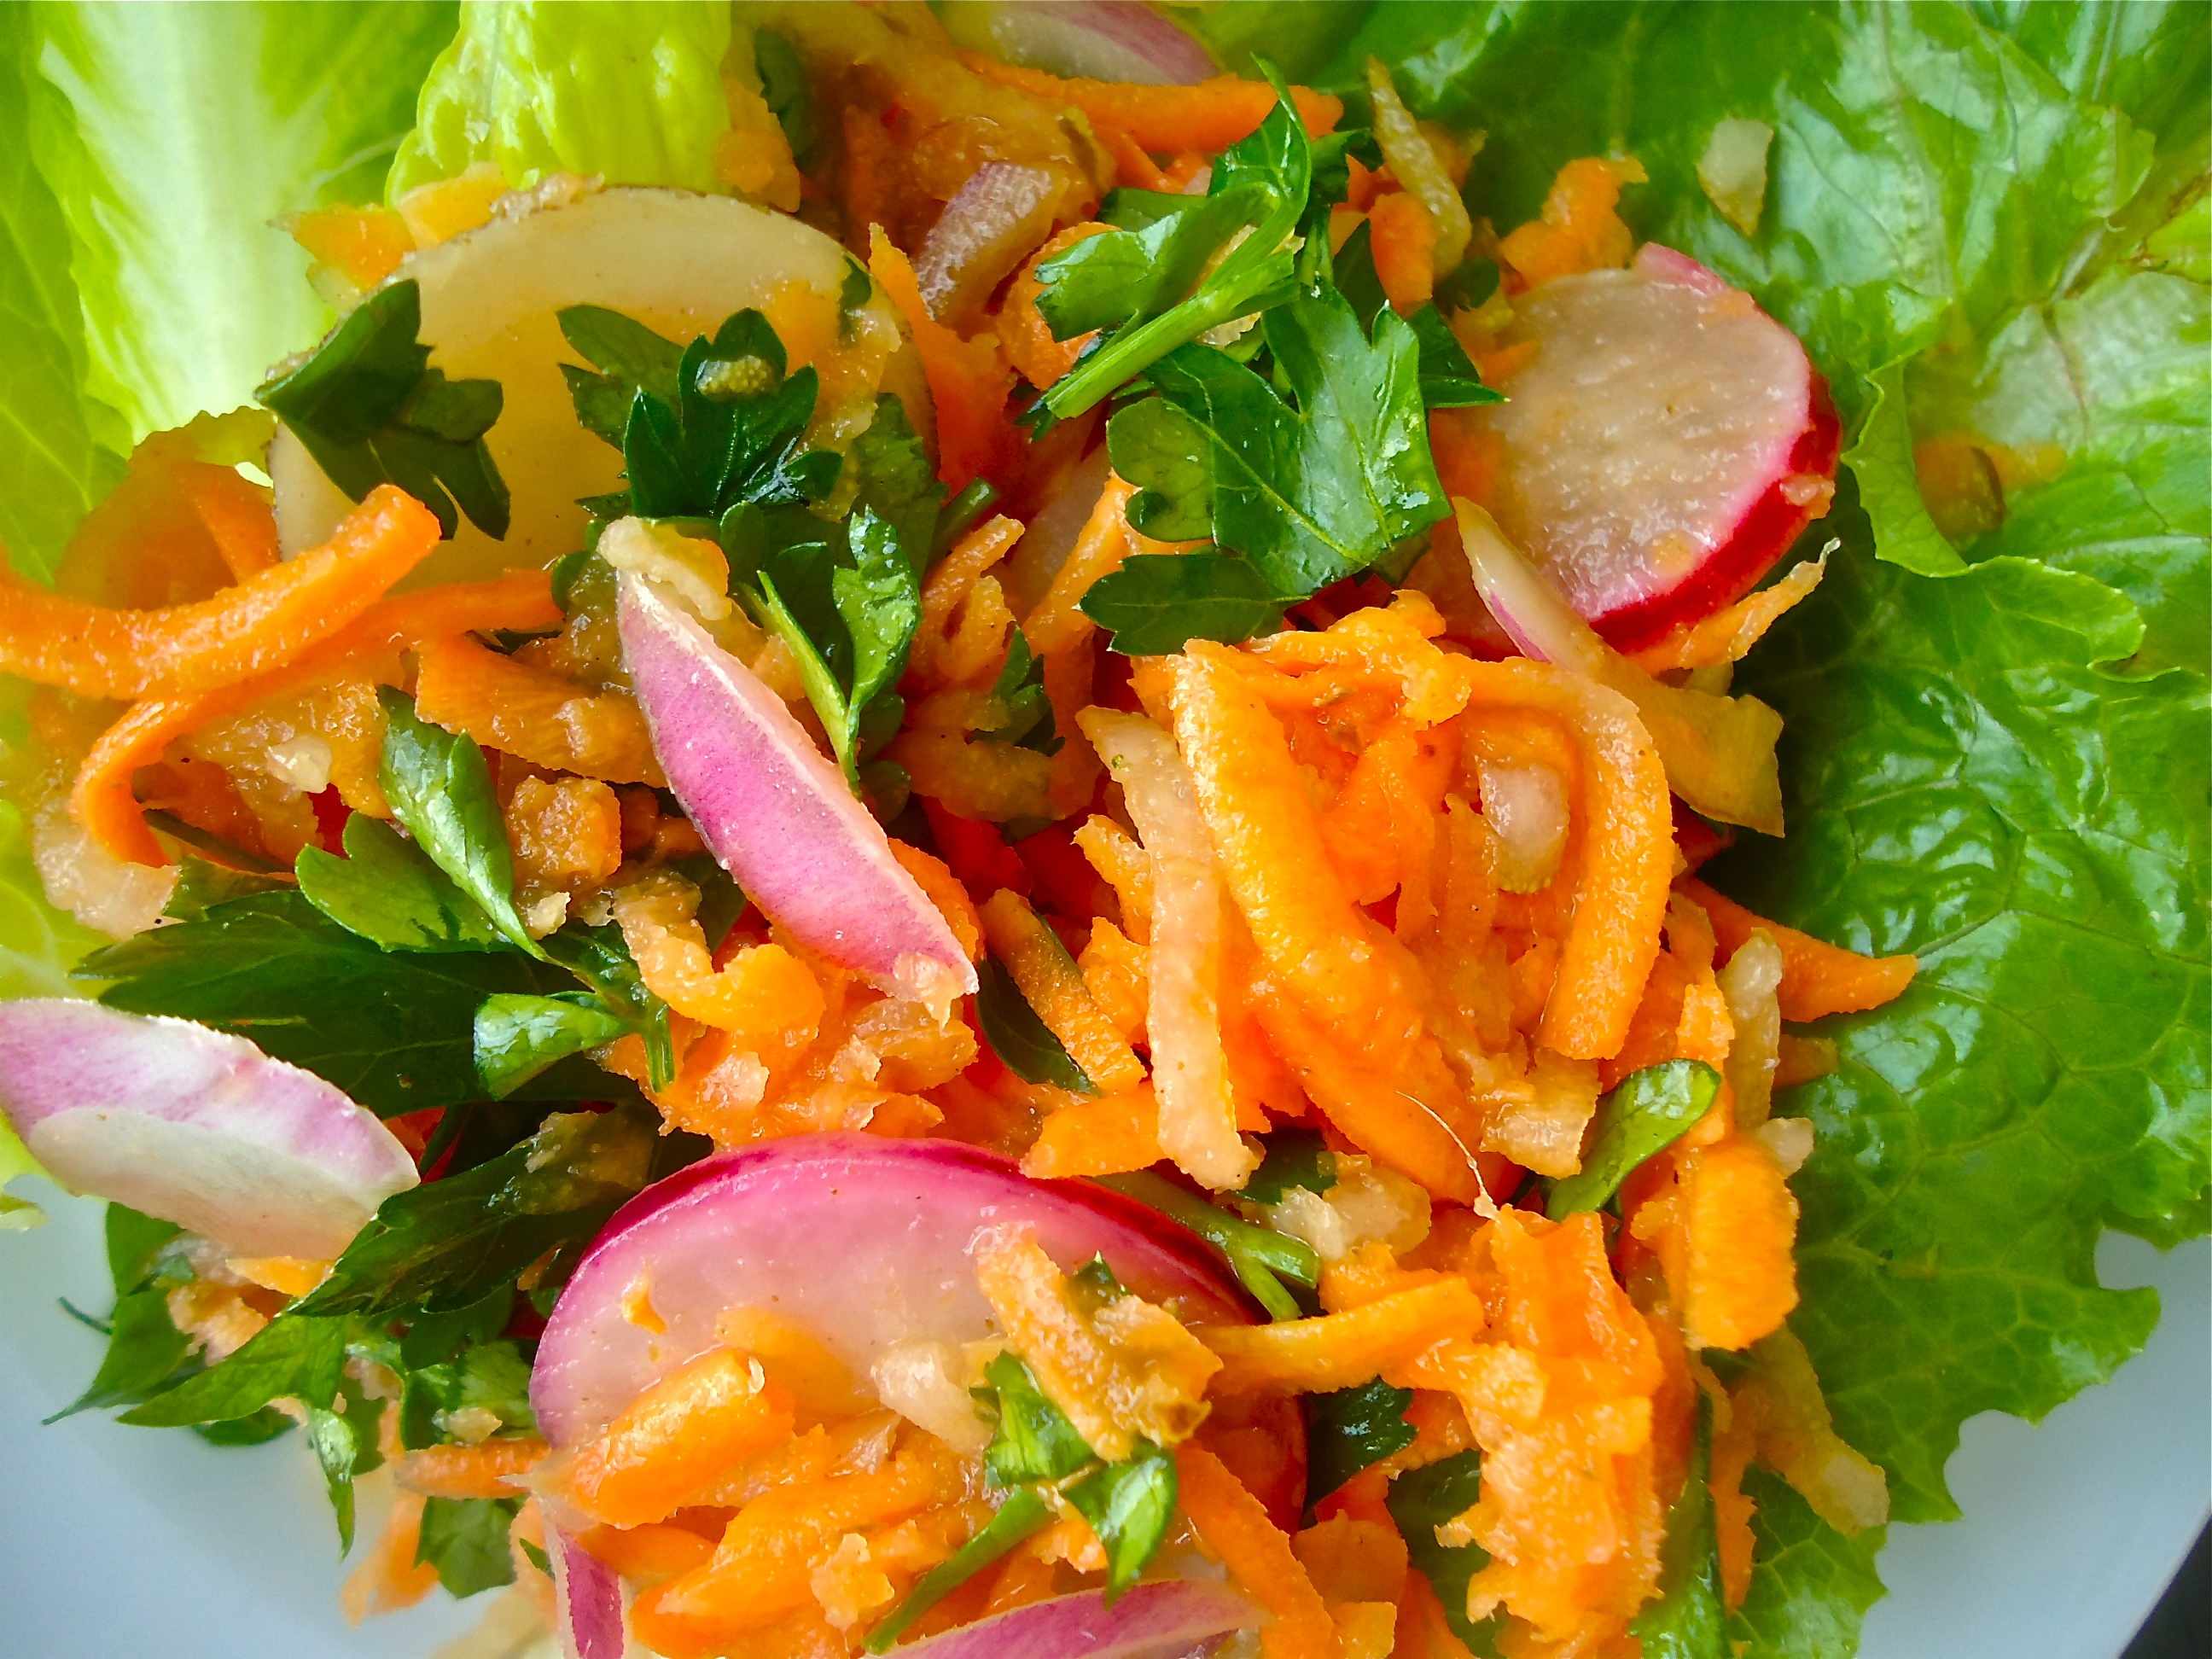
Beautiful locally grown, organic carrots and radish.

Mix up the tangy dressing. The ground coriander adds a nice light lemon flavor.

Mix up the tangy dressing. The ground coriander adds a nice light lemon flavor.

Shred the carrots - I use my Cuisinart which makes quick work of it.

Shred the carrots – the Cuisinart makes quick work of it.

Use the same size shred for the pears which also should be under ripe. No need to peel them either but do remove the center and seeds.

Use the same size shred for the pears which also should be under ripe. No need to peel them either but do remove the center and seeds.

Slice the radish as thinly as possible. A mandoline would be perfect for this job!

Slice the radish as thinly as possible. A mandoline would be perfect for this job!

To assist in keeping the veggies and fruit from turning color, add the dressing to the carrots before shredding the next ingredient, mixing that in with the dressing coated mixture.

To assist in keeping the veggies and fruit from turning color, add the dressing to the carrots before shredding the next ingredient, and mixing that in with the dressing coated mixture.

Here is this slaw served with grilled sugar cane shrimp (wrapped in bacon).

Here is this slaw served with grilled sugar cane shrimp (wrapped in bacon).

Crunchy Carrot “Slaw”

Nice as a side for southern-favorite barbeque cookouts or as a first course with grilled shrimp or fish. Uses winter time in-season produce like carrots, pears and radish too!

  • 2 tbl rice vinegar
  • 1 tbl honey
  • Juice of half a lemon (remove seeds)
  • 2 tsp Ginger People Spread (OR 1 tsp fresh grated ginger plus 1 tsp honey or agave nectar)
  • ½ tsp ground coriander
  • 1 tbl grape oil (or light olive oil)
  • Fresh carrots, enough to make about 3 cups shredded carrots
  • 5-6 fresh radish, washed
  • 2 pears, washed, peel left on and seeds removed. Do not use soft pears.
  • 1/2 cup chopped red onion
  • 1 cup fresh parsley, washed and chopped

In a small bowl mix the first 6 ingredients and set aside. Grate the carrots into a large bowl and drizzle with the vinegar dressing. Stir gently to combine. Next grate the pears and add to the mixture, stirring so that everything is coated in the vinegar dressing. Slice the radish paper thin with a mandoline (or a very sharp knife) and add to the slaw with the red onion. Stir to combine. Cover and refrigerate at least an hour for flavors to meld. Just before serving stir in the fresh chopped parsley.

Serves 6-8.

Advertisement

“THE” twice baked potato for the ‘epicurean’ in all of us.

Back to the real world now after almost a week away and I am still thinking about all the wonderful restaurants I encountered while in Ohio. I have a newfound appreciation for the Cleveland area and it’s bounty of dining delights – any foodie should be very happy to visit that town, especially during the summer. I’ll get more in depth on the trip later, specifically the West Side Market. Coming from my town where one must exert a good bit of time to finding ingredients like fresh butchered meats, game and/or unusual spices it is a treat to literally shop under one roof for it all.

My recipe today may be one that you’re familiar with or if you’re over about age 40, enjoyed at a “fine dining’ restaurant many years ago. In my family it is known as “THE” twice-baked potato and is one of my go-to side dishes for steak or lamb chops. I created this specifically as a tribute to my favorite restaurant from childhood, The Elite Epicurean, located in Columbia, SC (my hometown).

The Elite Epicurean opened in 1932 and it’s location on the corner of Main and Laurel Streets meant that it was across from the Federal Courthouse and City Hall. When it closed in 1997 many a ‘politico’ and/or local mover and shaker-type had enjoyed it’s European/Mediterranean fare. My Dad’s office was downtown and he often lunched there, I guess, as a member of the ‘traffic club’ – a professional organization for those in transportation industries.

I remember dining at the Elite Epicurean on special occasions, like birthdays and my high school graduation. It was like a fancy diner with a long bar, wooden tables (white table clothes too) and big overstuffed booths along one wall. But here the food was the thing. They had what, in those days, would be considered a huge menu with lots of variety. Their lunch menu was sizeable, famous for sandwiches with curious names like “The City Hall,” with a tongue and cheek description reading something like, “conservatively roasted with a liberal dose of mayonnaise.” And “The IBM,” “logically stacked with onions and programmed to your specifications.”

The dinner menu had for that time “epicurean” level entrees like lamb chops, veal, shrimp cooked in a wine sauce as well as an actual “amuse buche” served along with your meal… fancy-smancy for Columbia, SC in the 1970’s and 80’s. Of course, I always ordered the most exotic thing I could find on the menu, like the lamb or grilled calamari, while everyone else opted for something more conventional. The one thing we would all agree on, however, was the masterpiece known as the Epicurean potato.

This twice-baked potato was the best…ever. It was crispy on the outside – because it was fried, yes, fried! But the inside was light, fluffy and rich. I do not know exactly what was mixed into those potatoes but it was nothing short of spud perfection.

Apparently the restaurant closed one day in ’97 without any prior notice but after being a business in decline for years. I’m sure oblivious patrons would have rallied to the cause if they had known; it was a sad day. In years since, I came up with my own recipe, and although it is not fried, it packs on the calorie count with the butter, cheese and light cream. It’s a make-ahead side dish – add some chopped ham, sauteed minced veggies or fresh-made sausage and it could be a meal in itself too.

To me it’s claim to fame is reminding me of fun times with my family, particularly my father, and interestingly enough it was the side dish served to my now-husband at the first meal I ever prepared for him. I always thought (he says) it was the accompanying rack of lamb that propelled him to fall for me but now that I think about it, maybe it was “THE” twice-baked potato all along…

Clean potatoes are wrapped in foil – just like a regular baked potato.

After baking, allow the potatoes to cool a little so you can handle them. Slice the potatoes in half so that the two pieces will be able lay flat in the baking dish. Russet potatoes work best. Carefully scoop out the cooked potato.

The cooked potato goes into a bowl or container. Mash with a large spoon or potato masher.

Here are the potato jackets, sprinkled with a touch of salt and pepper and ready to be filled.

After adding in softened butter pour in the half and half. Mix in the sour cream and salt and pepper.

Three ingredients for the topping: butter, cheese and flour.

The topping is crumbly but moist.

Fill the jackets with the potato mixture and then…

Carefully spoon on the topping. Bake in a preheated 400 degree oven – or hold in the refrigerator until 20-25 minutes before serving time, then bake.

“The” Twice Baked Potatoes

  • 2 large Russet baking potatoes
  • 6 tbl softened butter (salted)
  • ½ cup finely shredded Parmesan or Romano cheese
  • 1/3 cup all-purpose flour
  • ¼ cup half and half
  • ¼ cup sour cream
  • ½ tsp. salt
  • ½ tsp. pepper
  • Extra salt and pepper for the jackets

Preheat oven to 500 degrees. Wash (scrub if necessary) and dry the potatoes. Wrap each potato in foil and place in the oven. Bake for 1 hour or until cooked through. Remove from oven and allow to cool slightly. Reduce oven temp to 400 degrees.

In a medium bowl mix 4 tablespoons butter, cheese and flour. Stir to combine to make a crumbly mixture. Set aside.

Slice potatoes in half so that each half will sit on its flat side. Carefully scoop out each potato and place the cooked potato “insides” into a medium bowl. Mash the insides with a potato masher or a mixer or a large, flat spoon. Add the remaining 2 tablespoons butter, the half and half and the sour cream to make the filling. Season with the ½ tsp salt and ½ tsp pepper.

Place the potato skin ‘jackets’ in a buttered baking dish. Sprinkle the inside of each jacket with a little salt and pepper. Spoon the filling into the jackets. Top each potato half with the cheese/butter crumble mixture*. At this point you can cover potatoes and hold up to a day in the refrigerator if you like.

Place potatoes back in the preheated oven and bake 20-25 minutes until filling is hot and the tops are browned. Serve immediately. Makes 4 servings and can be easily doubled.

Got Okra?

Okra is one of my favorite foods. Yes, I love it fried but also in gumbos, stewed with tomatoes, pickled, and even slow cooked alone for what my mother and I refer to as “slimey okra”. Has a nice ring to it, doesn’t it? When the fresh okra started coming in heavy in our garden, my Mama would prepare a small pot of slimey okra just for her and I to share. It is basically just plain okra slow cooked whole in slightly salted water. The okra releases it’s “goo” (called mucilage) and the entire okra was well, in a word, ‘slimey’. Since none of my other family members would come within 6 feet of it, the slimey okra was all ours. Yum.

If you like gumbo you know it’s this same goo that makes a traditional gumbo thick but if you cook it with tomatoes some of the sliminess is reduced (due to the acidity of the tomatoes). During my childhood, we ate many dinners of stewed okra and tomatoes – seasoned with a little bacon, salt and pepper and usually served over rice. This is very much a South Carolina dish and we ate it often during the summer months when the main ingredients were literally over flowing from our backyard garden. It made a light but filling summer supper during those hot months.

In my okra research, I recently found out that okra can also be described as a health food since it’s high in fiber, vitamin C, and folate content and contains antioxidants too. The seeds of edible okra also produce oil that is high in unsaturated fats and apparently tastes and smell pleasant, although I’ve never found okra oil for sale. I’ll have research this more. Okra seed oil is also suitable as a biofuel. Okra of different varieties is grown and eaten throughout the world – from Malaysia to Nigeria to Vietnam to the Caribbean.

Of course, here in the South we love our okra. I do believe it is a very under-rated vegetable – obviously it’s good for you and can be prepared in many ways – surely one to suit most any taste. Now frying okra is probably the least healthy but very tasty. My “died-in-the-wool non-southern food eating” husband now loves fried okra. Yes, he told me didn’t like “southern food” when we first met and yes, I married him anyway. I feel one of my goals in life is to undo the wrongs of bad food – so I’ve been converting him slowly over the past 7 years. But that’s a story for another post – or two.

Fried okra is a treat in our house and I prepare it for special occasions and/or when the first local okra comes into harvest, which is about right now. It so happens that I was testing a mustard roasted pork loin recipe when I made some fried okra so I paired them with creamy stone-ground grits. It was a wonderful combination of flavors and texture. I’ll be posting the recipes and images for the entire meal soon but I’ve included one picture now, just to whet your appetite!

Cut the washed okra into slices about a half inch in size – but smaller is okay too.

I use a little grape oil to coat the okra; it allows the cornmeal to stick better.

Sprinkle the okra with salt, pepper and the cornmeal.

Add the cornmeal coated okra to the hot oil. My cast iron skillet is perfect for frying up a pound or so of okra. Too much okra in a small pan would not cook as evenly.

The okra is getting browned. Try to avoid stirring and flipping the okra too much. Having a seasoned skillet and a familiar stove top makes this easier.

Here you can see the okra at about 10 minutes into the frying process – won’t be long now!

The okra is ready…crunchy with a great fresh flavor. Remove to a paper towel lined platter so the excess oil can drain off. Fried okra is best eaten asap!

Here is that fried okra crowning a plate of creamy stone-ground grits and mustard roasted pork loin. Delicious.

Fried Okra

  • 1 lb. fresh tender okra, washed
  • 1 tbl. grape oil*
  • 1/3 cup cornmeal
  • 1 tsp salt
  • ½ tsp. pepper
  • ¼ + 1 tbl. vegetable oil

Trim the stems from the okra and cut each pod into approximately ½ inch slices. Sprinkle the okra with grape oil and stir lightly to distribute the oil throughout. Sprinkle the okra with the salt, pepper and the cornmeal. Stir to coat.

Heat a heavy skillet (I use a seasoned cast iron skillet) and add ¼ cup plus 1 tbl. good quality vegetable oil (I use a canola blend). Heat until very hot, but not smoking. Lower the heat slightly and add the okra all at once. It may splatter, so be careful. Allow to ‘fry” for a full minute or so before turning the mixture over. Adjust temp as necessary so okra cooks at a medium high temp but does not burn. Try not to smash the okra too much and stir only as necessary to allow even cooking. Total cooking time should be 15-20 minutes depending on the size of your pan.

Remove okra to a paper towel lined plate to drain excess oil, season with more sat and pepper to taste if necessary, and serve immediately.

* Grape oil has a higher burn temp than most other oils such as olive oil, so I use it when I know I will be cooking in high heat.

Surprising Summer Citrus Couscous Salad

Today I offer up a recipe that is full of surprises. Like the first time you ever tasted salty and sweet together – who would have thought those two seemingly opposite tastes would complement each other so well? Couscous is an old grain, semolina actually, originally first used in North Africa/Andalusian regions and now widely loved from the Middle East to Europe to South America and the U.S. But the couscous is not the stunner really – well, it may be since I write about Southern-style US cooking, so the fact that I use this as a base for my salad may be out of the box. However, my recipe incorporates other ingredients in combination that are more of a revelation than any actual shock.

Over the years I’ve made this “salad”, I’ve used quite a few combinations of herbs, spices and fruit flavors. But when I stumbled upon the combination of fresh mint and thyme mixed with orange zest I was happily surprised by the overwhelming fresh taste and alluring citrus smell of this dish. I emphasize the use of fresh herbs and fresh orange, not sure anything less would work out as well. The Balsamic vinaigrette also lends the whole dish a bit of extra zing and the crunch of the bell peppers and sweetness of the craisins adds more dimension. It also looks very pretty on the plate!

You can use any flavor or brand of couscous you prefer. I like this garlic and olive oil flavor. The salad can be made ahead – some may even say its better when the flavors are allowed to meld together awhile…

Par boil (or blanche) the carrots for 2 minutes, drain and allow to cool.

Here are the pretty veggies (and craisins). You can use any color bell pepper you have or like.

Adding the Balsamic to the juice and oil.

Add the honey to vinaigrette. I happened to have some unfiltered orange blossom honey – yummy!

This is what cooked couscous looks like in the pan, before it’s been fluffed with a fork. For those who are not familiar…

Here is the mint, thyme and orange zest – looks pretty and smells heavenly!

Everything has been added and lightly mixed in. Add in the vinaigrette carefully – you may find, as I do, that you don’t need the whole recipe. Impress your family and friends at your next cook out with this salad! My husband loves this salad – it goes great along side burgers, steaks or grilled fish or chicken.

Summer Citrus Couscous Salad

  • 1 (5.8 oz) box couscous, any flavor
  • 1 large fresh orange
  • 1 cup+ chopped carrots, small chop,
  • ½ cup chopped sweet bell pepper, small chop
  • 1/3 cup dried cranberries (such as Ocean Spray Craisins), roughly chopped
  • ¼ cup fresh mint, washed and chopped
  • 2 tbl. fresh thyme, washed and minced
  • 2 tbl. Balsamic vinegar
  • 1/3 cup extra virgin olive oil
  • 1 ½ tbl. honey
  • ¼ tsp. salt plus extra
  • fresh ground pepper

Prepare the couscous according to directions on the box. Allow to cool and fluff with fork. Set aside. In a small saucepan bring some water to a boil. Add carrots and boil approximately 2 minutes. Remove from heat and drain. Allow to cool. Grate the zest from the orange to get at least 1 tablespoon. Set aside. Squeeze the orange to get about ½ cup juice.

In a medium bowl whisk together the orange juice, olive oil, honey and vinegar. Sprinkle with ¼ tsp. salt, whisk together. You should have almost 1 cup. Set aside.

In a large serving bowl mix together the carrots, bell pepper, craisins and the cooled couscous. Mix lightly. Stir in the mint, orange zest and thyme. Pour half the vinaigrette over the mixture and carefully mix together. Add some ground pepper. You may pour in rest of vinaigrette – or not. I find I usually only use a little more half the vinaigrette. Use the leftover vinaigrette as a base for an Italian-style salad dressing or grilling marinade. It will keep in the refrigerator several days.

Adjust the couscous salad with salt and pepper to your taste. You may serve immediately or cover and store in the refrigerator until ready to use, up to a day.

Farmers market pick: savory stuffed patty pan squash

Do you like farmer’s markets? I love farmers markets. Within 20 miles of my home there are 8, yes 8, farmers markets going on during the week. Very nice for our little ‘burg. Some are relatively small and simple and some are bigger with a festival atmosphere and extras like craft vendors, live music and food trucks. I love them so much that dear Hubby has put my wallet on ‘farmers market lock-down’ and I now stick to a budget of less than $15. Well, unless we’re having a meal there or we’re having guests and I’m cooking.

The farmers market is made for browsers like me. I tend to walk around a lot before I make any purchases and this can drive those who are not browsers (like Hubby) crazy. He’s not a browser, but a git-r-done type person. It can also unnerve some of the farmers and vendors, I realized recently. I see them look at me as I pass by their stall for the third or fourth time and I can tell they are thinking, “You again…what are you up to? Just go ahead and buy something already!”

To each their own, but I like “look’ in” as my Daddy would say. It’s relaxing to me and with the variety of colors, textures and smells, my creative juices begin to flow. I am formulating a plan in my noggin. What looks great? What may be out of season and NOT available soon? What is reasonably priced? How can I combine this vegetable with some other ingredient I have a hankering to cook this weekend? Hum. At this point Hubby has taken our girl over to get lemonade or an Italian ice and left me to decide my final purchases. Smart, smart Hubby.

Thus, I come home with a bunch of patty pan squash, among other things. Over the last several weeks I had seen them at every farmers market. They are so cute with bright yellow scalloped bases splashed with dark green splotches – they can even sport hats! “They’d make the perfect vessel for something delicious”, I thought.

As it so happens, I also stopped that day by a favorite vendor, Mibek Farms, and discovered garlic sausages for sale. My brain clicked into high gear and after one mediocre attempt, the Savory Stuffed Patty Pan Squash recipe was given the thumbs up by Hubby (and me). This recipe uses a combination of fresh herbs I had available, but feel free to try your own preferred mixture and if you can’t find garlic sausage use your favorite fresh, uncured sausage.

See you at the farmers market!

Use a sharp knife to remove the top at an angle. Trim excess pulp and remove any large seeds.

Scoop pulp out of the squash. I use the knife to neatly loosen it all the way around and a spoon to remove the center. It should pop out, but don’t break through to the bottom.

Chop the pulp. Again, remove any excessively large seeds.

Brown the sausage and then drain on paper towels. You’ll use this saute pan to…

…saute the onions. No need to use a clean pan. Try to scrape up any leftover sausage bits.

Meanwhile, par boil the patty pan squash. If you have big ones, drop the bottoms in first and allow to cook about 2 minutes, then drop in the tops and remove all after another minute. The small patty squash should par boil about 1 minute for the bottoms plus 30 seconds or so for the tops.

Drain the squash in a colander. I pour some ice and water over them to stop the cooking process.

Add the cooked rice, drained sausage, herbs, chopped squash pulp and a few cracks of pepper to the sauteed onions.

Stir in the tomato paste and chopped tomato until just mixed.

Place half the filling mixture in the baking dish and place the patty pan bottoms on top. Sprinkle some salt inside the squash bottoms and spoon in the filling.

Place the tops on the squash and cover the baking dish with foil (or a cover if you have one). Out of the oven in about 45 minutes.

Savory Stuffed Patty Pan Squash

  • 4-5 large or 8-10 small patty pan squash, cleaned with pulp scooped out and chopped (save tops)
  • 1 cup brown rice
  • 2 ¼ cups vegetable stock
  • 1 tsp. olive oil
  • 2/3 cup sweet onion, small chop
  • 2-3 links garlic sausage (or your favorite fresh sausage, not breakfast sausage) casings removed
  • ½ tsp. + extra salt
  • ¼ cup fresh Italian parsley, chopped
  • ¼ cup fresh oregano, chopped
  • 1 tsp. herbs de Provence
  • ½ tsp. powdered thyme
  • 1 tbl. grape oil or vegetable oil
  • 2 tbl. tomato paste
  • 1 small tomato, small chop
  • Fresh ground pepper

Cook the rice in the vegetable stock and olive oil. Heat the grape oil in a large sauté pan and brown the sausage and drain on paper towels. Do not clean the pan but sauté the onions in the pan for about 3-4 minutes, scraping up the bits stuck in the pan. Remove form heat and set aside.

In a large pot heat water and add a few dashes of salt. When near boiling drop squash bottoms in salted water and allow to par boil about 2 minutes for the large patty pan and 1 minute for the small size. Add the tops and cook all another 1 minute. Drain all the squash in a colander and cool with water and/or ice to stop any further cooking.

Add the sausage, rice, and herbs to the onions and stir. Stir in the tomato paste, shopped tomato and a few cracks of fresh pepper and salt to taste.

Preheat oven to 350 degrees. In a 9 x 13 oven-proof baking dish spread about half the filling. Place the patty pan bottoms on the filling and lightly sprinkle the interiors with salt. Spoon filling into each patty and place tops on each squash. Cover the baking dish with a cover or foil and bake for about 35 minutes in the preheated oven. Remove foil and bake another 5-10 minutes.

Frustration turns to temptation with summer vegetable hash.

Can you imagine anything any better than crispy fresh corn, peppers and squash? Our 4-year old loves this side dish, as do her parents!

Oh boy can I tell it’s Monday. After taking last Friday off for a long mother’s day weekend I planned on posting a wonderful recipe I have for old-fashioned cottage cheese dill rolls today. Nicely browned outside and soft on the inside, these rolls are fairly easy to prepare and smell awesome coming out of the oven; a balanced, soothing way to start any week. Well, unless you can’t access the images and spend 3 hours making various attempts at a work around…augh.

Needless to say, instead I’m off in a new direction…a summer direction. This side dish is also very easy, pretty and delicious to the palate. In my town, local vegetables are starting to come into season (yes, early I know) so in honor of the soon to be harvested crop of sweet corn, bell peppers and squash I give you my vegetable hash recipe. It’s my go-to summer side and compliments all kinds of grilled proteins including fish, chicken and beef. I served it last weekend with a nice citrus grilled salmon fillet. If you’d rather leave out the dairy just use a little more olive oil and no light cream, tastes just as great.

I’d say the key with this is to use very fresh veggies and try to get everything cut into the same small chop. Yes, it is worth it to use fresh corn and cut it off the cob yourself!

Straight forward ingredients – again the key is to use fresh vegetables, hopefully locally grown.

Cutting corn off the cob is easy peasy – sharp knife, steady hand and shallow bowl to catch the occasional flying kernel.

Sweet bell peppers bathed in olive oil and butter.

Zucchini time!

Here comes the…corn. I love all the color!

Season with the pasta sprinkle or herbs de provence and the pepper. Salt is optional – many times I add no additional salt!

Summer Vegetable Hash

  • 2 ½ cups fresh corn (about 3 large ears)
  • 3 cups diced zucchini squash (about 2 large zucchini)
  • 1 cup diced bell pepper (1 large)
  • 2 tbl. extra virgin olive oil
  • ¼ tsp. fresh ground pepper
  • 2 tbl. unsalted butter
  • 1 ½ tsp. Penzey’s Pasta Sprinkle OR Herbs de Provence
  • 1-2 tbl. light cream (half & half)
  • Salt, optional –  to taste

Melt butter with the olive oil in a large sauté pan. Bring the heat up and add the bell pepper, cook 1-2 minutes, stirring occasionally. Add zucchini and cook 3 more minutes and then add the corn, cooking 2-3 more minutes. Stir again. Sprinkle with seasonings and turn down heat. Stir in the light cream just before serving. Makes 4 cups of “hash” enough for 8 servings.

Red, red rice oh you taste so fine…

Okay, now for something totally different. Well, if you’re not from South Carolina that is.

There are a few dishes that I always associate with barbeque* (and by barbeque I mean some type of pork  that has been slow, and I mean s-l-o-w roasted, and served with a slather of vinegary sauce). This would be potato salad, coleslaw and red rice. Before I get away on a tangent about barbeque I will stop and state that I plan on devoting several posts to barbeque but for the moment this one is about red rice…

As far as I know, red rice is very specific to the Lowcountry of South Carolina. I have seen it referred to as “Savannah red rice”, which geography speaking is the southern most point in the area known as the Lowcountry. My mother made lots of rice dishes as my dad was a child of the most eastern outskirts of the Lowcountry, above and to the east of Charleston, Williamsburg County, SC. It’s really closer to Myrtle Beach, if you are familiar. Red rice was and is my favorite rice dish.

This area was known for growing rice back in the day (the 1700’s up until the Civil War) and for its very fine pit roasted whole hog barbeque. Even now, this barbeque technique is referred to as Williamsburg County style, at least among those ‘in the know’, and it’s the way I learned to cook barbeque. Side note: I recently saw Rodney Scott and family of Scott’s Bar-b-que on Andrew Zimmern’s Travel Channel show, Bizarre Foods America. Scott’s is located in Hemingway, SC (Williamsburg County) and yes, he uses the same technique and you can see some of it here. He knows what he is doing.

Okay, so that was the tangent I was hoping to avoid…knew that would happen. Another ingredient that is so prevalent along the coast here (and grown commercially too) is the tomato. We have wonderful tomato-growing soil. Red rice is the child of all these things, well sort of, if you count bacon in place of the barbeque. My mother also makes red rice when she bakes ham and you can make a delicious one-dish meal by adding chopped ham to red rice leftovers.

I used brown rice in this recipe as well as lots of bell pepper and a good vegetable broth replaces plain water. Yes, I do use bacon (good quality is best). There’s really no substitute for that pig… Oink, oink!

* I have always spelled barbeque with a “q” instead of a “c”. According to the Merriam-Webster Dictionary both barbecue AND barbeque are acceptable spellings. Since barbeque was originally created along the SC/NC coasts, the SC Barbeque Association uses the “q” spelling, and with the letter “q” being too underutilized in my opinion, I’m sticking with the “q”…thank you!

Ingredients for red rice are simple but the flavor is complex.

The onion and bell pepper should be cut into a medium chop and be about the same size.

Yes this is bacon – regular bacon will do. If you can resist nibbling, the cooked and crumbled bacon is great on top of the red rice. Unfortunately I was weakened by my love of bacon and so there was none left for this batch…

Saute the veggies in 1 tablespoon of the bacon drippings until just tender.

Mix the warm broth and the tomato paste together.

All the ingredients bubbling to a low boil. Pop on the lid, turn the heat to a low simmer and wait…

…and here’s the tricky part. Does not look too appetizing at the moment, does it? Resist the urge to stir it up now. If the liquid has been absorbed, remove from the heat, remove the lid and let it sit for a few minutes. Then…

Fluff with a fork. Here you have red rice. It will be a creamy and a little sticky. I like the brown rice as it really absorbs the tomato flavor plus it’s better for you!

Red Rice

  • 1 heaping cup brown rice (or 1 1/3 cups white extra long grain rice)
  • 2/3 cup sweet bell pepper, medium chop
  • 2/3 cup onion, medium chop
  • 3 slices bacon
  • 2 cups vegetable stock or broth, preferably low sodium
  • 1 can tomato paste
  • ½ tsp. salt
  • hot sauce, optional

In a saucepan fry the bacon until crisp and remove all but 1 Tbl. of the bacon fat. Set the bacon aside to drain for later use. Saute the peppers and the onion in the bacon fat until just tender – about 3 minutes. Set aside.

Warm the broth and whisk or stir in the tomato paste. In a heavy bottom pot (that has a lid) pour the broth/tomato mixture and heat to a boil. Mix in the rice, the vegetables, and the salt and stir. Turn down the heat and cover with lid. Simmer on a low heat for about 40-45 minutes or until all liquid is absorbed. You can do this by tilting the pot to the side and see if any liquid is still in the bottom of the pot.

When you are reasonably assured all liquid has been absorbed, remove the lid and allow to sit for about 5 minutes off the heat. Then carefully fluff with a fork. The rice will be tender and slightly creamy. Serve immediately with crumbled bacon on top and hot sauce on the side, if desired. Serves 4-6.

Dressed To Impress: Spinach-Stuffed Zucchini Cups

Got zucchini? Well, here in the Lowcountry it isn’t quite peak time yet for this muti-purpose vegetable but with the balmy weather I am anticipating a bumper crop for local farmers and home gardeners alike. Come June (maybe late May this year?) there should be a regular zucchini-palooza in my county and I will be looking for new, delish ways to prepare this veggie by July 4th. You can only make (and consume) so much zucchini bread, sauteed squash and cheesy squash casserole in a summer.

Southerners are genuinely generous and Southern gardeners especially are apt to leave a grocery bag of just-plucked goodies on their neighbor’s front porch or co-worker’s desk – a happy surprise that never wears out it’s welcome at my house. But what to do with all that zucchini? Well, here’a a easy-to-prepare recipe that’s dressed to impress – and tastes darn good too.

Tip: Straight zucchini that are all about the same size work best in this dish, both in presentation and to allow even cooking.

Making "cups" with zucchini is easy. A small spoon will work to scoop out the core as will a melon-ball tool. Try not to break through the bottom of the "cup".

Fairly simple and short list of ingredients for this filling.

Adding the ricotta to the eggs. A whisk work great.

Mix in the spinach, the grated Parmesan and the seasonings.

Butter crumbs: Melt some butter in a bowl, add fresh bread crumbs and voilà "butter crumbs". I use the end slices of bread loaves - we call them the heel - for crumbs.

Butter crumbs: I usually have a bag of these in my refrigerator ready to top casseroles, mac-n-cheese or as a crust for oven-fried pork chops.

Sprinkle the butter crumbs over all the zucchini cups or simply dip into the crumbs.

Ready for the oven!

Out of the oven, all cheesy spinachy good with a crunchy top of butter crumb. This recipe makes at least 8 servings of filling, just use more zucchini. Or use your leftover filling to stuff sweet Vidalia onions!

Spinach-Stuffed Zucchini with Butter Crumbs

  • (1) 16 oz. package frozen spinach or fresh (enough for 1-½ cups cooked, chopped spinach that has been squeezed dry)
  • 1 whole egg plus 1 egg yolk
  • 1 cup ricotta cheese (light or whole milk)
  • 2/3 cup finely shredded Parmesan cheese
  • ½ tsp. salt plus extra
  • ¼ tsp. ground nutmeg
  • ½ tsp. freshly ground pepper
  • 5-6 medium zucchinis, washed and dried
  • Butter crumbs (see below)

If using frozen spinach cook according to package instructions, cool and drain. Squeeze out as much water as possible. I use paper towels.

Prepare zucchini by either slicing them the long dimension in half or cutting into 1 ½” pieces to make ‘cups’. Either way, scoop out the core of the zucchini avoiding breaking through to the bottom. Sprinkle lightly with salt and set aside.

In a medium bowl whisk the eggs, add the ricotta and the Parmesan. Mix in the spinach and the salt, pepper, and nutmeg. Fill each zucchini cup or boat with the spinach mixture. Sprinkle with butter crumbs* (or dip the cups into the crumbs as I did, whatever is easiest).

Place in a lightly oiled baking pan, cover with foil and bake in a preheated 350 degree oven for 30 minutes. Remove foil and bake another 5-8 minutes until the tops are browned.

Left over filling can be refrigerated for 3 days. This filling is delicious stuffed in fish fillets like sole, flounder or even salmon or stuffed into other vegetables like Vidalia onions and baked.

*Butter Crumbs: Toast 2  slices of your favorite lunch bread (I use the heel). Grind in a food processor to a fine crumb. Melt 1 Tbl. butter in a bowl in the microwave. Toss the crumbs in the melted butter. That’s it. I store the butter crumbs in a plastic zip baggie in the frig.